Posted on Leave a comment

Sewing Organized

I have been garment sewing for almost 10 years. I have two small bedrooms to house my sewing, and one of the bedrooms still has to function as a guest bedroom occasionally. Over the past few years I have invested time and money to get my sewing space and stash into an organized state, and it has vastly increased the amount of sewing I do, and my enjoyment. I thought I would share of some of my discoveries.

I purchased most of the furniture from IKEA several years ago. I am very happy with my purchases. They have held up well, and are key to keeping my area neat. I use a narrow 9 drawer unit, that has 5 short drawers and 4 taller drawers which accommodates both smaller thread spools and the taller (serger) thread spools. This also keeps my thread dust free and out of the sun. In several tall narrow shelving units, I use art bin storage boxes, both the single and double sizes to contain my notions. I keep a label maker in my sewing room and each bin is labelled. All of my necessary notions are kept in these bins, such as zippers, bindings, elastic, buttons, ribbon, lace, pins and needles, tapes (twill, stay, and adhesive) and are within easy reach. Fabric is stored in several cabinets which sit on the floor with doors, or in closets on wire shelves to keep fabric dust free and out of the sun. The fabric is neatly flat folded on the shelves.

IKEA cabinets with doors and wire shelving in closet keep uniformly flat folded fabric dust free and out of sun.
IKEA shelving with labelled Art Bin Storage boxes contain notions. Bottom shelf holds interfacing, pattern paper, and several fabric bolts.
Big Board Ironing board on custom wood station with keyboard underneath, and monitor over. The Sew Perfect Table provides an extremely sturdy base for your sewing machine, eliminating vibration which can cause trouble. The swing lamps provide plenty of light in all my work areas. The hanging multi-drawer wall organizer for feet and machine accessories.

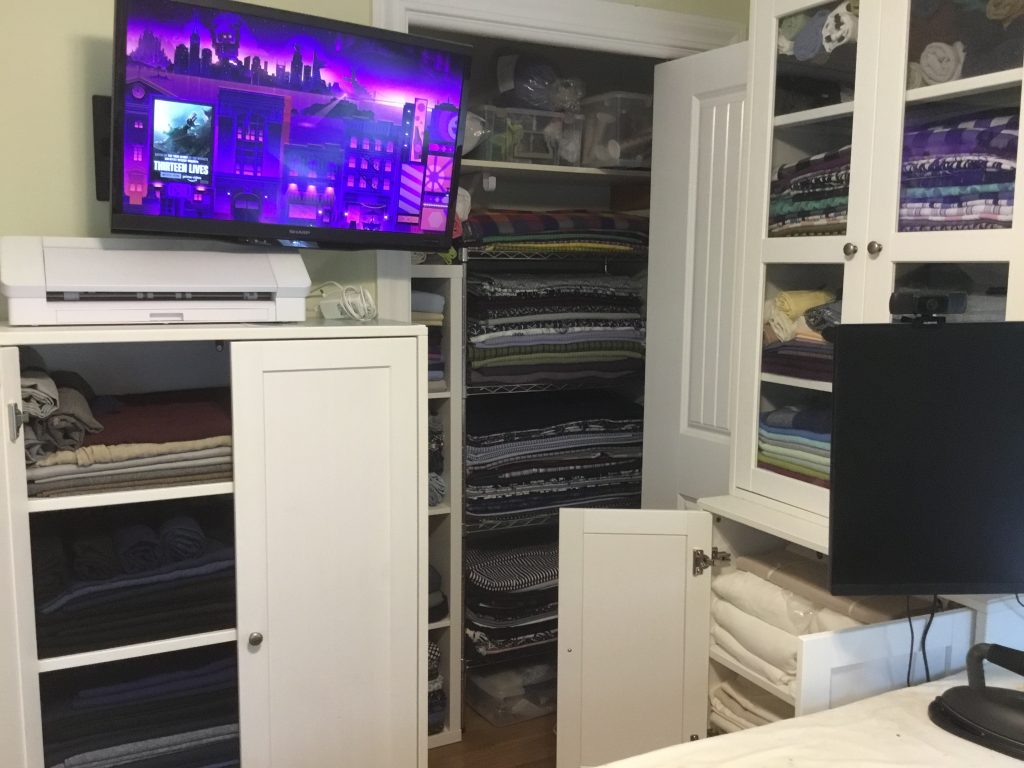
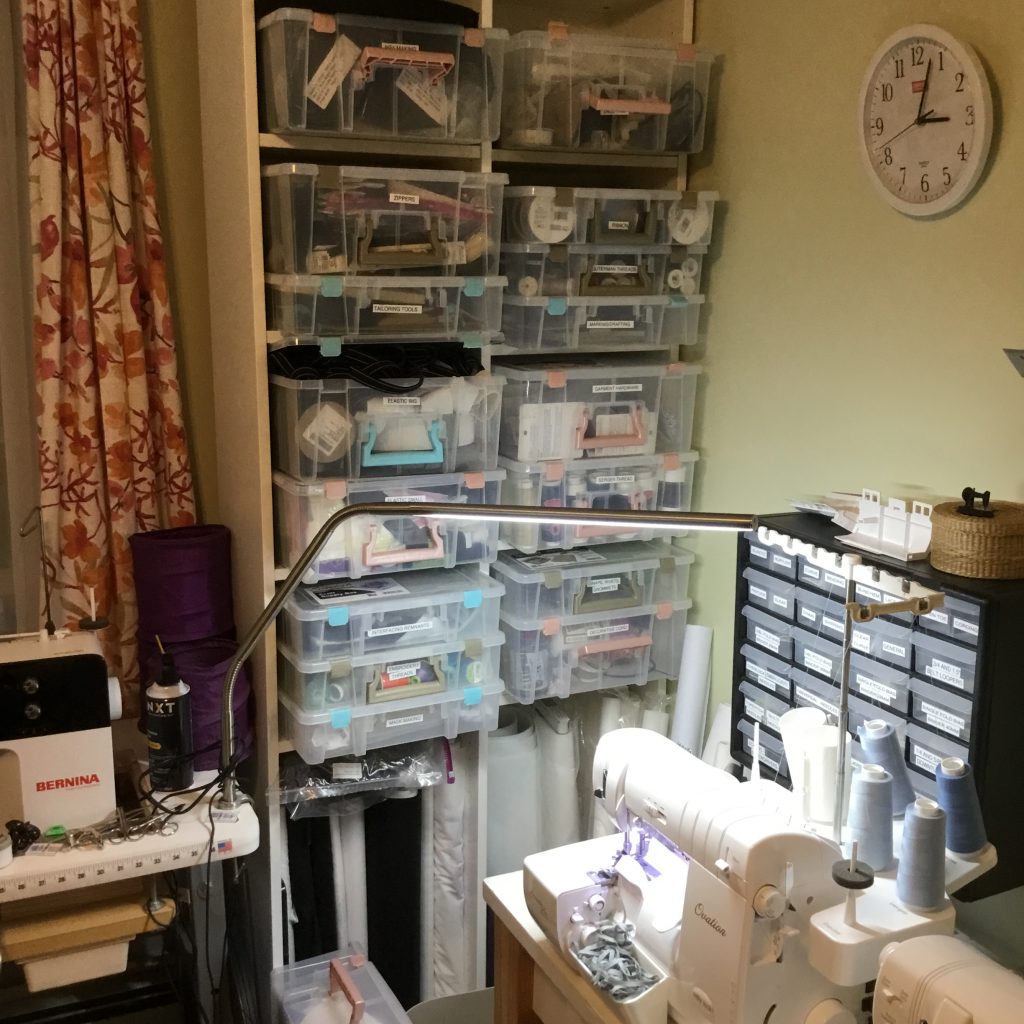
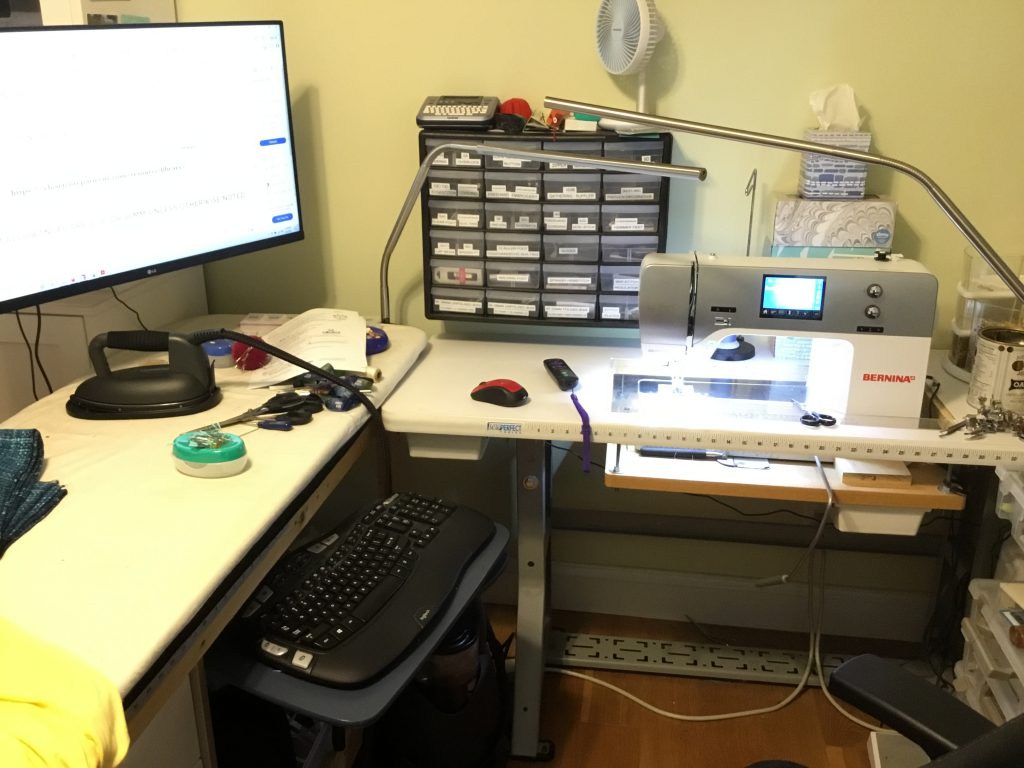
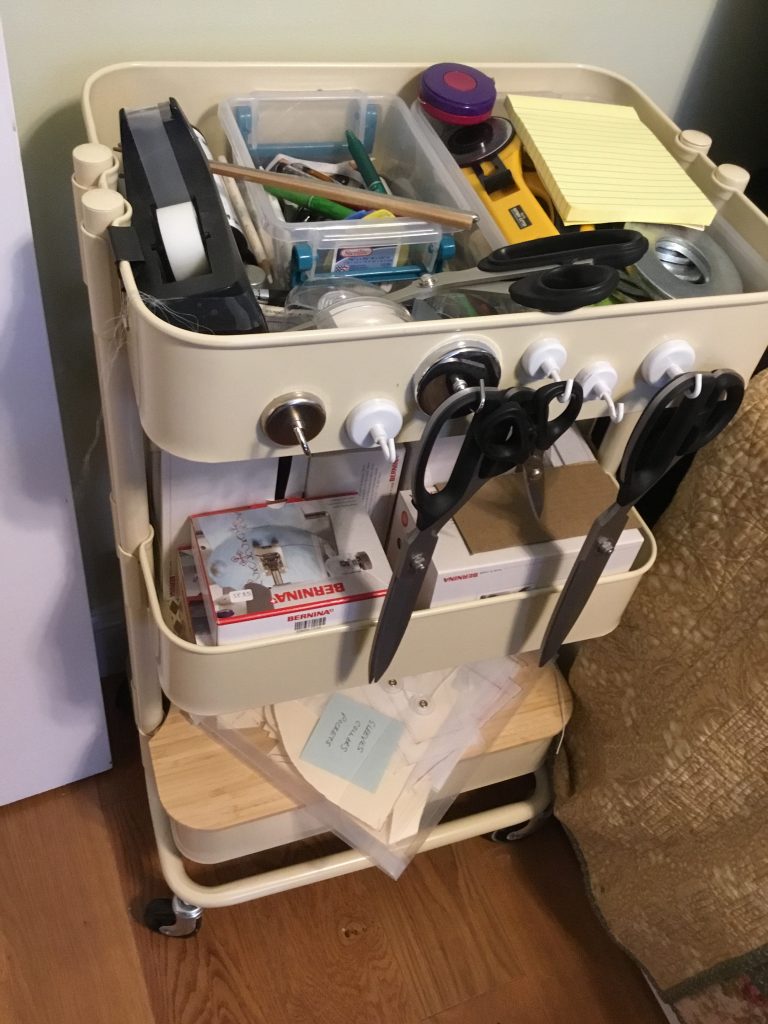
My husband built me a ironing station that fits a big board, and it sits alongside my sewing machine area. Just above my ironing station I have a monitor, and below the ironing board is a swing out keyboard and mouse station which allows me to access online materials while I work. With many patterns there are so many online resources such as: sew- alongs, videos, and tutorials which are so helpful to have in front of you while sewing. I have a cast off TV for light entertainment during those times when I am doing the mind numbingly boring tasks. I have two sewing machines (one embroidery equipped), and two overlock/coverstitch combination machines. One is always threaded for overlock and the other is threaded for coverstitch. I keep feet and other accessories in two small drawer units which are mounted to the wall, one for sergers and a second for traditional sewing machines. All of my machines sit on Sew Perfect Tables. These are very sturdy tables. I purchased rubber feet for them to protect the floors and cut down on vibration. These tables are not cheap or pretty but I will use no others. Sewing machines are investments which need to be protected. All my machines are plugged into grounded surge protectors. I have a single chair on wheels which allows me to easily move between ironing, sewing and serging. I purchased a set of rubber wheels which prevents the wheels from getting clogged with threads. I have three swing arm lamps which are installed in the corners, and can rotate to light up my different work areas. The variable speed ceiling fan is a blessing. In the closets I have a couple of wire shelving units and another IKEA narrow shelving unit. I also bought a couple of the metal rolling carts. I use magnetic hooks to hang scissors. One stays near the cutting table and is filled with tools needed to draft and cut patterns, such as pattern weights, tape, scissors, rotary cutters. The second remains near the sewing machine area and holds common items, such as pins, tweezers, stitch pickers, awls, clips, more scissors, common ironing items such as ham and organza ironing sheet, and basting threads.

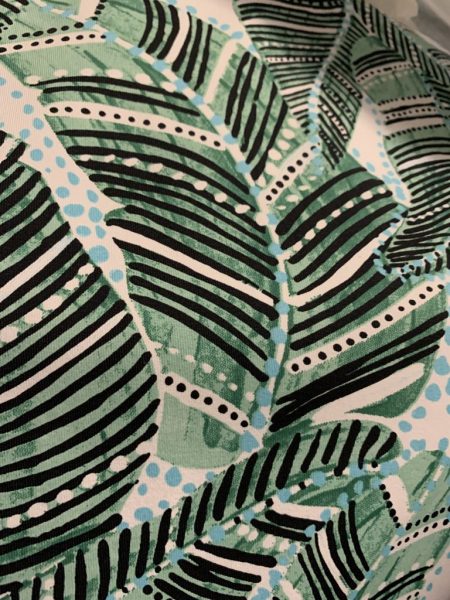
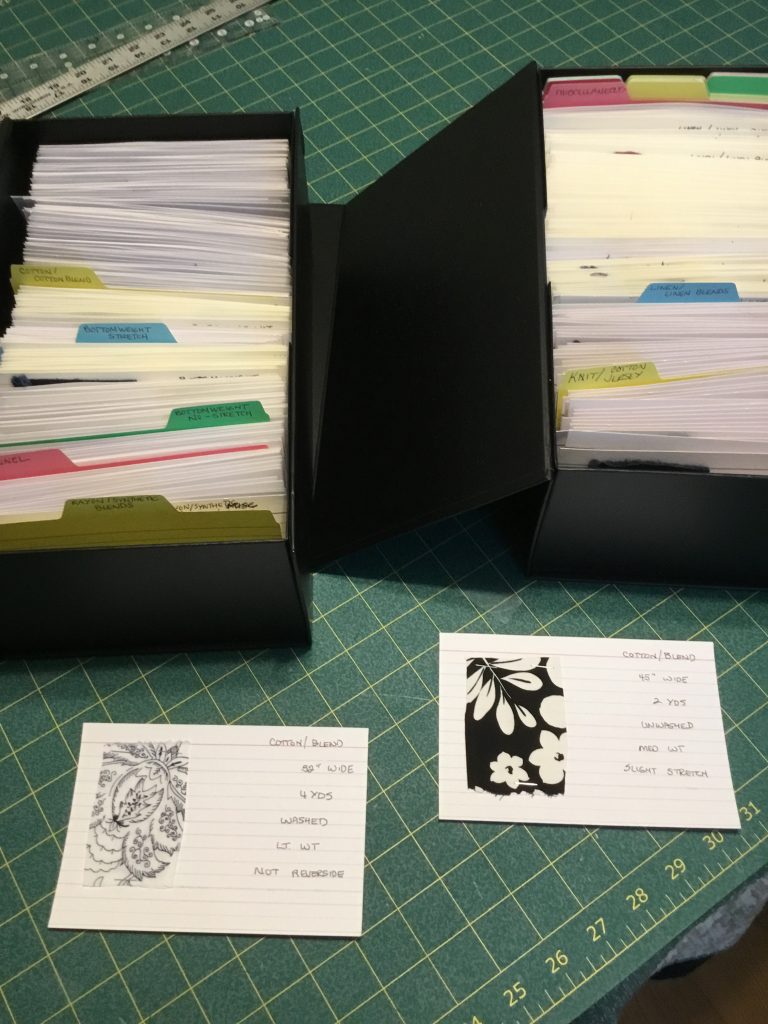
My stash is organized into following categories: Bottom weight , Knits, Cotton and Cotton Blends, Linen and Linen Blends, Rayon and Synthetics, Fleece, Flannel. Any piece over 2 yards is catalogued. I snip a small sample and staple onto an index card with the following information: Category, Width, Yardage, Washed or Not, Stretch if any, Weight, special care instructions, where and when it was purchased if known. When I start a new project I can thumb through these cards and I will know if there is enough yardage before pulling fabric from the shelves. I found searching for fabric in my stash would cause large messes before this system. In time I will enter this into a database on my computer to help searching my stash even quicker. I also uniformly flat fold all my fabrics and store the fabric by category. Pieces smaller than two yards are neatly rolled and kept near the larger flat folds. This makes finding a piece of stash fabric very easy. This was time consuming, but I find I am using stash fabric more and more because I know what I have and exactly where to find it.

Index cards containing fabric sample and information, sorted into fabric categories.

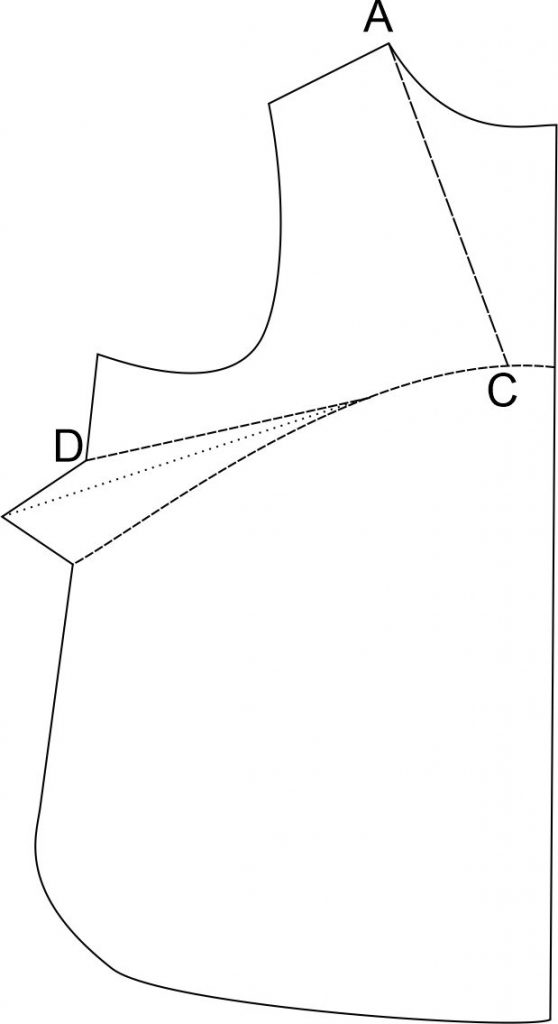
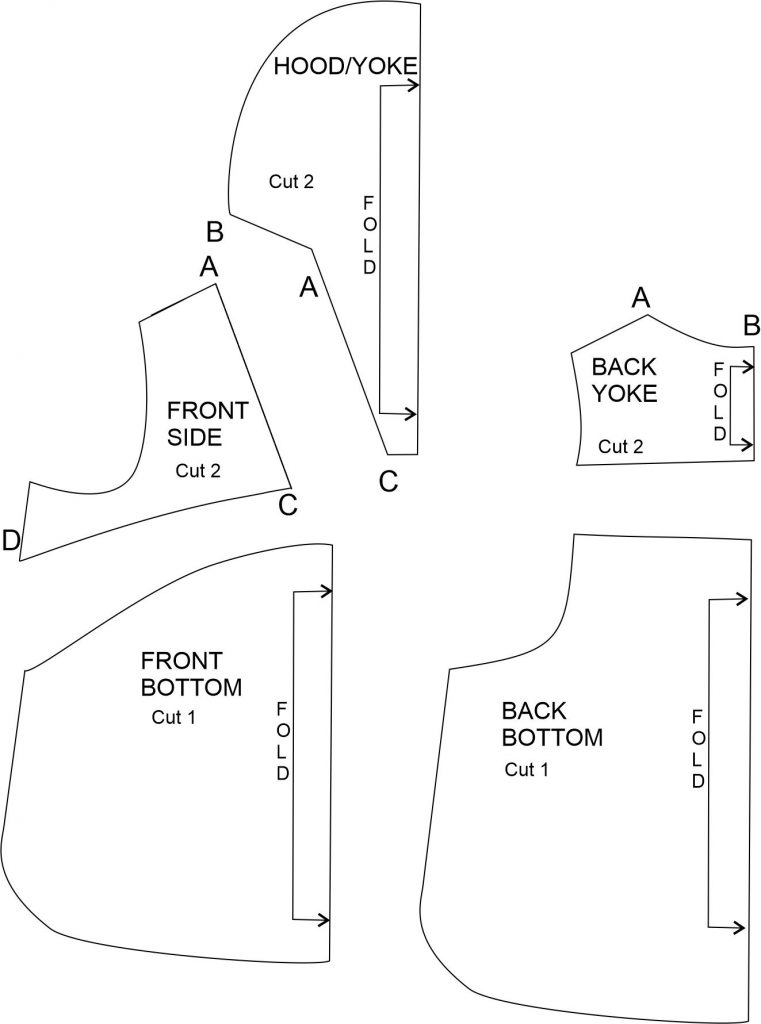
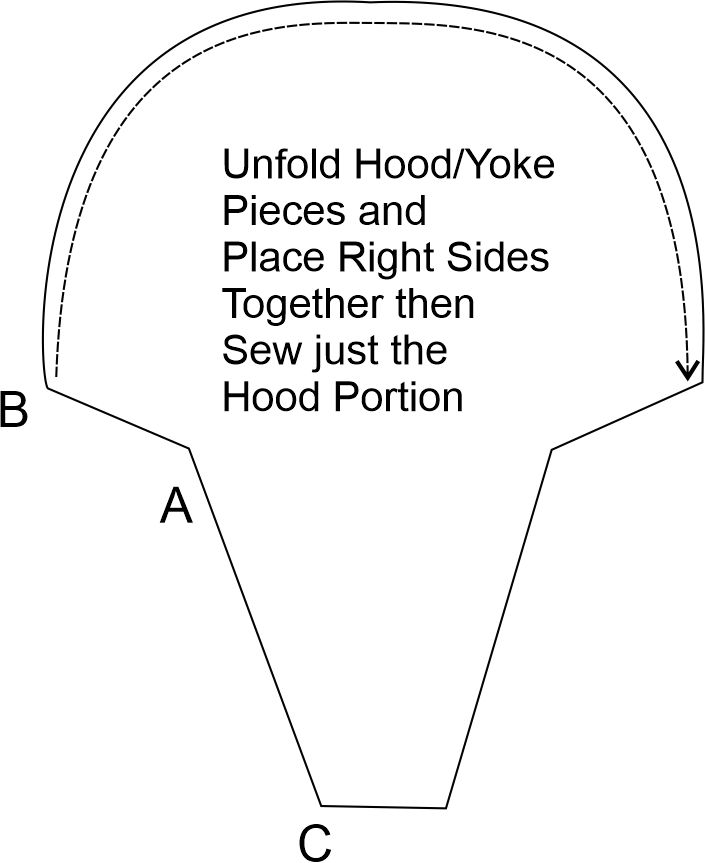
I typical purchase PDF patterns from indie designers. I print them on A0 paper. I will trace off of the printed A0 pattern, onto a pattern paper. Any modifications are made to the pattern paper pieces, thus preserving the original print out. I file the A0 print outs separately alphabetically by company name, and use clear plastic file folders to keep my traced off pattern pieces, instructions, or notes. I file them in magazine file boxes, again labelled by garment type: Dresses, Skirts, Pants, Blouses, Knit Tops, Knit Bottoms, Jackets/Outerwear, etc.

Repurposed dining table with cutting mat on top, straddling a twin bed. Second ironing station in far corner. The table is up on bed risers and can be slide over to uncover bed and over the top of the ironing station.

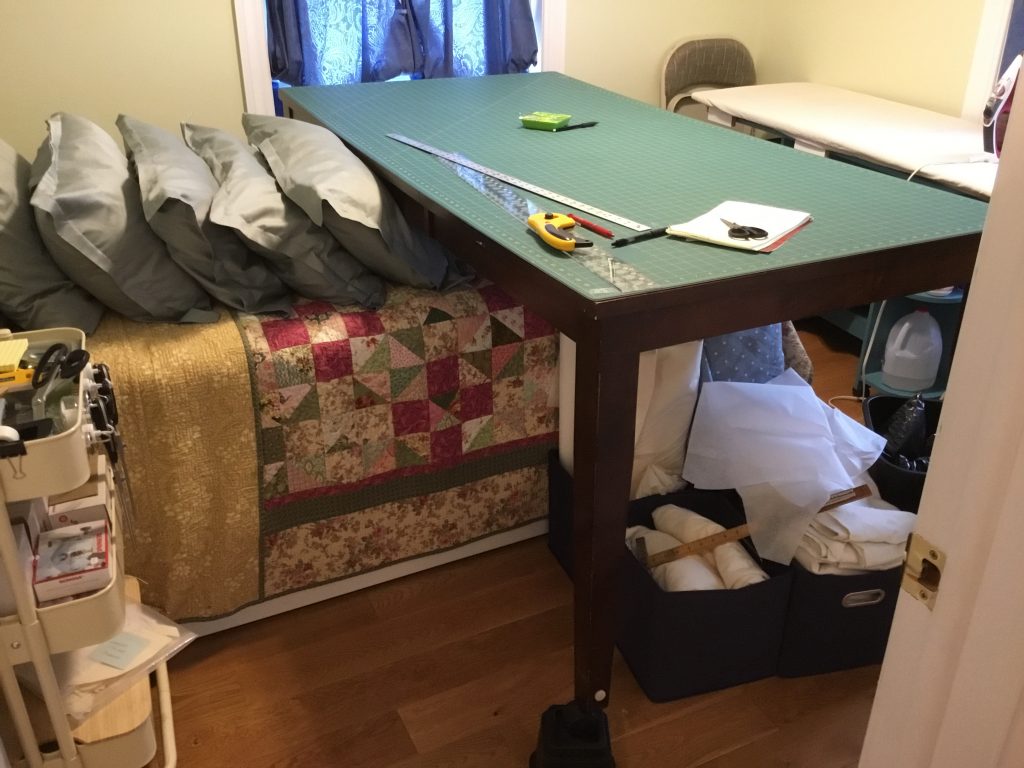
One of the biggest necessities for me was the need for a cutting table. In the second bedroom is a twin size bed, that can convert into a king size bed, another IKEA unit. I purchased a used dining table from a thrift shop that had a few leaves, and four legs that are on the outside corners. The table straddles the twin bed, giving me almost complete access to the table edges. I bought bed risers to raise the table up to make cutting and drafting more comfortable. I splurged on a large cutting mat for the top of the table. In this room I have a second ironing board which is another big board that sits upon a fold up rolling unit. This allows for ironing large pieces and is close to the cutting table. When guests come I carefully slide the dining table down past end of bed, which can fit over the top of the ironing station. The ironing station could also collapse by pulling the big board off and putting it in closet. Guest have access to a nightstand, bed, the top of the cutting table, and even a small amount of closet space for hanging. A floating shelf above the head of bed is great place for ruler and drafting supplies. A fourth swing arm lamp provides extra light.

Magnetic hooks on the rolling cart make items even more accessible.

Assembling this work area took a lot of time and research. I was patient and often bought second hand, or from thrift shops, and budget stores whenever possible. I saved my money to buy quality machines, fabric, and notions. With the rising costs, it is such a time and money saver to be organized. I dreamed of retiring and throwing myself into my hobby of sewing and all the planning and preparation has paid off. I am not affiliated with any of the following products or manufacturers, but will share some of the product names that have served me well.

For scissors I use Kai scissors almost exclusively. For thread I purchase them online through Wawak and Superior Threads. Sewing machines are Bernina. Overlock/Coverstitch machines are Baby Lock. Irons are tricky and frankly I have never found one that I would recommend. That said I currently have a Reliable Steam Iron (distilled water), an Oliso (tap water), and a Laura Star steam iron (tap water and very $$$). Should enough time pass without failure I will update this post, but it is still too soon to tell. I tried many other brands and they all disappointed (Rowenta I so wanted to love you). My lighting is Slimline 3 Daylight lamps from Daylight Company. Many pieces were from IKEA. The ironing boards are from Big Board Enterprises. As for fabric, I purchase lots of dead stock. When I have perfected a pattern I then splurge on expensive fabric, but in the meantime I keep lots of affordable stuff around to practice on. My favorite online is FabricMartFabrics.com. I buy at a local selvage operation occasionally. I purchase most of the good stuff directly from local sewing and fabric shops to help keep them going. I have had little success thrifting fabrics, but many folks post great finds. Again, I have no affiliation with any of these sellers. Many of these purchases were made over the years so do your own research before investing. Things have may have changed over time. I just offer these as a place to start.

I hope these ideas can help make your own sewing space more organized and efficient, and leave more time and money for the fun stuff. Happy sewing!

Posted on Leave a comment

2022 Sewing Bee – Round 3 – Jalie 3906 Tania Coatigan

The challenge was to make Jalie’s 3906 Tania Coatigan. The pattern is an unlined boxy mix between a coat and a cardigan. On my sewing to do list was a summer weight linen jacket to wear to an outdoor graduation ceremony coming up in a few weeks. My daughter is being presented with her PhD of English from Harvard University, which she completed last year during the pandemic. This would be a pinnacle moment and my outfit needed to rise to the occasion.

Although many Jalie patterns do extend beyond my measurements, the size chart on the Tania stopped below my waist and hip measurements. My measurements are 46.5” bust, C cup, 49” waist, and 59” hips. No stranger to altering patterns to accommodate my figure, I compared my measurements to the body measurements chart. My first toile was size DD bust, grading out to GG (largest size) at the waist plus a total of 5 inches (or 1.25” per side) to the waist and hips. I choose the size GG sleeves, as my biceps are quite large at 19 inches. As a layering piece, the jacket would need generous sleeves. I drew the GG armscye on my pattern starting at the DD shoulder point, being sure to maintain the grainlines. This both extended the armscye to the side and lowered it down the side. The extensions were within ½” of each other, which I felt I could handle when easing the sleeve onto the armscye, so I made no further adjustments to the sleeve or armscye. My combination of large upper arms and a relatively small chest is sometimes a challenge when modifying patterns to fit me, but the alterations worked out smoothly for this pattern. With the pattern traced and altered, I was ready to make a muslin.

My first toile was made out of muslin and it really caught my eye. I always leave the side seams partially open for my first fitting. I loved the unique neckline. The shoulders and sleeves worked perfectly. I loved that I could push up the sleeves and they stayed up reminiscent of the style I loved in the 80’s. The front fell straight and remained neatly gapped, yet wide enough to meet in the center front. The overall make was straight forward. But, turning to the side the muslin revealed significant shortages from the waist to the hips. At this point, I choose not to add to just the waist and hips, but instead added to the front and back side pieces, 2 inches at the arm pit, tapering to 4 inches where the hip meets the hem. The seam allowance between upper and lower pieces were removed, before making the alteration to the sides, and then re-added after the width of the garment had been adjusted. This is important. Also, truing up the side seams to make sure the lengths are the same is another important step. This approach would maintain a more boxy shape, and avoid the look of a swing coat. The results were a jacket that fit well on the shoulders, chest, and arms, and then continued through waist and hips with a relaxed slightly oversized appearance that skimmed over my figure in all the right places.

Unlike the last challenge which involved a lot of new technology and tools, I went old school on this challenge, relying heavily upon pencil and paper. After re-drawing the upper and lower front and upper and lower back pattern pieces with the additional inches, I made a further enhancement to the pattern, by adding a back vent or slit, to the lower back panels. A back vent would make the jacket more flattering and comfortable when seated. I also decided to line the jacket to add some polish. I compared the lining pattern pieces which I purchased separately to the original pattern pieces to understand how I should draft the lining pieces for my heavily modified version. The complexity of lining a back vent proved to be difficult. Thank goodness for the YouTube video describing how to draft and sew a skirt back vent with lining by “Sew Imani”.

For my second toile, I chose a lightweight printed denim for the main fabric, and selected a printed rayon for the lining, both from my stash. The assembly went smoothly. Intending this as a second toile, this garment came out beautifully. The fit was exactly as I wanted it. I would have been done except that this jacket was too casual and much too warm for the upcoming graduation.

For my summer version, I chose to use a linen. I was also going to lose the lining, and replace it with a cotton voile underlining which would add some structure to the linen while maintaining the breathability. I had stumbled across a striped Ralph Lauren jacket which was my inspirational starting point. I found a navy and white striped linen in my stash, but there was only 3 yards and 6 inches. I had purchased this as an end of bolt remnant at a local fabric shop, several years ago. I also had some tissue thin white cotton voile in my stash. For added visual interest, I planned to cut the lower front and back panels at opposing angles. I would appliqué some perpendicular stripes on the lower sleeves. To change the visual proportion of the garment to better suit my figure, I would add angled intersecting appliquéd stripes along the lower part of the upper front panels. At that point I felt the garment would really pop.

Having just barely enough fabric, meant taking extra precautions when laying out the pattern pieces. To align the stripes, cutting each piece one at a time was necessary. Care had to be taken to mirror pieces to maintain the right side of the fabric and the desired direction of the stripes. A shockingly small pile of scraps was all that remained after cutting all the pattern pieces. There was another deviation from the pattern that I made at this point. I applied a piece of crisp shirt tailoring interfacing along the fold line on the top of the pocket on the lower front panels. This added stiffness and would discourage stretch along the top of the pocket, without altering the appearance. With the cutting of the main fabric pieces complete, it was time to underline.

With linings, you typically assemble the outer garment and the inner lining separately and join together. With underlining, each fabric piece is attached to a piece of lining material, before the garment is assembled. Some additional benefits of underlining versus lining are it can alter drape, and may reduce wrinkles, garment wrinkles that is….

Underlining would require finishing each pattern piece prior to assembly. All pieces except the facings and the collar would have to be underlined. All edges which you were instructed to finish in step 4 of the pattern would have the underlining extended over to the right side and clean finished. The sleeves and upper front panels were to have additional stripes appliquéd on. I underlined first, and then appliquéd. This being my first time underlining a garment, my technique evolved over the project. It is critical that the underlining not restrict or ripple under the main fabric. The grain line of underlining followed grain lines marked on the original pattern. The cotton voile was incredibly sheer, making it a bit of a challenge to work. Lightly starching both the main fabric and the underlining help to achieve a more precise layering of the pieces. I heavily pinned, then machine basted with a long stitch a quarter of an inch along all outside edges. This basting must fall within the seam allowance. To enclose raw edges where desired, I doubled folded the underlining over the edges and stitched them down. Again the width of the fold over must be less than the seam allowance. On the unfinished edges I trimmed the underlining even with the main fabric. This was a very time consuming process but the linen pieces felt more substantial afterwards, and the inside finishing was practically done.

Intending to pull out some of my lovely stashed white linen to make my additional stripes, I discovered that I had a lot of not quite white linen. In fact, I did not own any pure white fabric to match the white stripes in my linen. The only way to match the stripe was to fussy cut the stripes out of my shockingly small pile of scraps. Using a rotary cutter and an acrylic see thru ruler, I cut the strips leaving a 1/4 inch seam allowance on each side. I pinned the strip in place then machine stitched across one long edge of the white strip. I trimmed the seam allowance down to a generous 1/8th inch. I finger pressed along the other edge of the white strip, and then folded the strip over and pressed. Wanting to minimize topstitching on the jacket, I used the needle turn appliqué method to stitch the second edge of the stripe down by hand. There were twelve stripes total, three on each sleeve and three on each upper front panel. This brought back fond memories of my hand applique quilting from years ago.

At this point, the pieces were ready for assembly. I followed the patterns instructions. Extra care had to be taken to maintain spacing, and stripe alignment. Another advantage to underlining a garment is that all the hems and facings can be tacked just to the underlining leaving a smooth finish on the outside of the garment. Just a good press, and I was ready for my close ups.

For this challenge, I altered the pattern to accommodate my size. There is a story of a mechanic that charged thousands of dollars after making a repair with a single tap of a hammer. The value was in knowing where to strike. When altering patterns, the value is in knowing where to make the changes as well as the order and the amount of adjustments to make. This comes with experience. Every time I modify and fit a pattern I learn something new, and I improve. This time was no exception. This time I learned it was important to know when to stop. I felt a strong temptation to over fit this jacket. It would have had a much more swing shape to it, much like my figure. But, this time, I was able to stop myself, and consider the overall desired look of the garment. I really wanted a more boxy silhouette, which I achieved.

I also tackled some new to me techniques during this challenge. I underlined a garment for the first time to get the desired drape while maintaining breathability. I added a back vent to the pattern, to add comfort and improve the look of the garment when seated. I cut the lower front and back panels at an angle to add visual interest. I added some additional stripes to enhance the visual proportions of the overall garment. I also inadvertently completed my first low waste make, with just a few ounces of linen scraps remaining. I am so proud and excited to present this garment as my entry to Round 3 of the Sewing Bee 2022 Challenge. As always, I am grateful to Pattern Review, the contest committee, the moderator, the judges, the sponsors, and my fellow contestants, who together make the Sewing Bee the one of a kind inspirational experience that it is.

Posted on Leave a comment

2022 Sewing Bee – Round 2 – Buttonholes!

Buttonholes!!! Buttonholes! Okay, my first reaction was a bit panicked. Deep breaths. Read again. Buttonholes. “Sew an article of clothing with the buttonhole(s) being the primary focus.” It would be very easy to allow other elements such as the buttons, or the button band to become the focus of this garment. I wanted the buttonhole to be the star of the show!

I started panicking again. I kept re-reading the blog post and this statement stuck in my mind. “One of the things we encourage in this contest, is to think outside the box and to overcome some fears and challenges, while still trying to remain true to your own aesthetic.” This is precisely why I participate in the Sewing Bee. What would be my personal buttonhole challenge? Buttonholes are usually a pretty straightforward part of a project. I have no fear of machine buttonholes. I am grateful for my machine and its ability to reliably get the job done. I have done many bound buttonholes, including 17 hand sewn bound buttonholes on a denim jacket in a previous sewing bee challenge. I decided to focus on machine embroidery! I discovered there are many buttonhole embroidery designs available for purchase, but I wanted to challenge myself to digitize my own design from scratch. The design would incorporate a buttonhole. Furthermore, I wanted my machine to cut the buttonhole slit for me, as part of the embroidery project using my cut works attachment. Having limited embroidery digitizing experience and even less experience with my cut work tool, I was feeling sufficiently challenged.

My steps to complete the project were as follows:

  1. Select a garment pattern to be the home to some awesome buttonholes:

I choose the Anthea Puffed Sleeve Blouse by Anna Allen Sewing Patterns. I had made one before and it is a favorite garment. The Anthea Puffed Sleeve Blouse pattern is designed to be a swing top. Having studied the finished measurements, I determined the pattern would accommodate my pear shaped figure, and eliminate the need to grade out from bust to waist. This blouse offers great arm coverage, a sweet curved hem and in the right fabric, a wonderful swish. I made a straight size 22, but had to redraft the front piece to accommodate a 2.25 inch increase in the cut on button placket. With a 3 inch button placket, the buttons would now be 1.5 inches in from edge. With such a light fabric, this required the addition of concealed inside buttons and buttonholes which were closer to the edges of the button plackets, to keep the front panels closed and to prevent sagging. Another excellent opportunity to showcase the importance of buttons and buttonholes!

The original pattern is great, but I decided to refine some of the finishes. The gathering on the top and bottom of sleeves were to be replaced with pleats. French seams were to be used on the shoulders, sleeves, and sides. The armscye was to be turned and finished by hand, to give a faux French seam look. The pattern recommended a light to medium woven. I chose a medium weight linen, which was strong enough to support the applique and embroidery but still had sufficient drape. For this reason, much more attention had to be given to grading. Finally the changes to the pattern and finishes, along with the machine applique required significant reordering of the assembly instructions.

  1. Choose a design:

My aesthetic is classic, relaxed, comfortable, and uncomplicated with a touch of quirky. My buttonhole design had to be simple. Nothing over the top or too fussy stuff allowed. The buttonholes had to be the main focus of this garment. One of my favorite symbols is the Yin-yang, which represents a dynamic balance of opposing but complementary and interconnected forces. The Yin-yang symbol is both classic and uncomplicated with a bit of quirk. Small white and black round buttons would complete the design.

  1. Create a design in embroidery software:

I used Bernina Embroidery Software – Designer Plus Version 9. To digitize a Yin-yang symbol, I created a digitizing template, by drawing a 2.5” circle with two 1.25” circles stacked inside to form an 8 inside. If you squint, you can see the outlines of the Yin-yang symbol. My original intent was to embroider the whole design. The problem was the garment I chose to make required a light to medium weight fabric with good drape. The embroidery design if too dense would interfere with the drape on such a fabric. I completed a beautiful all embroidery design of the Yin-yang but due to its stitch density it was not going to work with the current planned garment. It is destined for a denim shirt soon! Reducing the density resulted in a less visually pleasing design.

Discouraged but not defeated, I switched directions and created a machine applique design with buttonholes embroidered on top. The cut work tool would be used in part of the design to cut my buttonhole slits. This eliminates the nerve-wracking step of cutting open buttonholes by hand. Switching to applique presented several new challenges. About a year ago, I took a wonderful class from Teri Hall from 2 Many Lizards, but that was the only machine applique design experience I had. The software can generate a .SVG cut file from the applique design which then can be used on a cutting machine.

I struggled with an updated version of the design software. Offsets, underlays, outlines, overlaps, sequencing, and fills were some of the many considerations. Thomas Edison is quoted as saying, “I never once failed at making a light bulb. I just found out 99 ways not to make one.” This sums up my experience with creating my first applique design from scratch. I learned so much in the past week. In the end, I am so proud of my Yin-yang buttonhole machine applique design.

  1. Prepare the pieces to be appliqued:

Using linen for both the garment and the applique pieces allowed the drape to be maintained and would guarantee the linen garment would be compatible with the applique during future laundering. I had never cut linen using my cutting machine, and it is NOT the same as cutting quilting cottons. I had to experiment and finally settled on the same blade and settings as cotton except for the force setting which increased by 3. I have a Silhouette Cameo 4. To prepare for cutting, I heavily starch my fabric pieces. I then apply Steam a Seam 2, Lite on the back. I remove the paper backing. I then run this through my cutting machine. I needed one white and one black curved tear drop shape, per applique.

  1. Test sew the design:

This was the most time consuming step in the entire process. I needed to decide on the right combination of garment fabric, the stabilizer used during embroidery, and the thread. When inevitably something went wrong, such as catastrophic thread build ups, insufficient coverage on the edges, and base fabric distortions, I would go back to step 3, and refine my design. The stabilizing, sequencing, layering, and density, had to be taken into consideration. I settled on using OESD Ultra Clean and Tear stabilizer under heavily starched fabric. The stabilizer was easily removed and left very little residue, which will completely dissolve during future launderings. I used polyester embroidery threads Isacord 40 wt black, and Floriani PF730 off white. I slowed my machine down significantly while embroidering. After getting several successful test pieces, I knew I had a reliable and repeatable combination.

  1. Sew the design on to final fabric:

I always start by pre-washing and drying my fabric. With linen, I often repeat it twice. I cut out a piece of garment fabric large enough to accommodate the piece to be embroidered with 4 inches extra on all sides. In this case, I am embroidering along the center front of the wearer’s right front piece. I marked the center front, making sure it was on grain. I then marked the placket, and the tops of the embroidered pieces on the back of the fabric. I then basted the center front line and short perpendicular lines at the tops of the embroidery using my sewing machine, set on a very long stitch and with reduced tension. The basting allows me to easily align my design on the front of the fabric, while being easy to remove prior to embroidering, and leaving no visible markings on the front. I then heavily starched my fabric. I hoop the starched fabric with the stabilizer underneath, making sure the center front line is parallel in the hoop. I decided on embroidering 3 Yin-yangs, with the centered one flipped to add some movement to the overall design. After the machine is positioned to embroider in the correct position, I remove my machine basting. The embroidery process is a bit more involved with applique. The machine will first sew placement lines and then stop. I carefully remove the hoop from the machine keeping the fabric hooped, and place my applique pieces according to the placement lines. I lightly press them with a small iron to set them in place with the Steam and Seam 2, Lite. The hoop goes back on the machine, and continues to embroider the edges of applique with a satin stitch. It then stitches the buttonholes. When all embroidery is complete, the machine stops and requests the cut work tool be installed. Before proceeding, I apply fray check on my buttonholes, and wait for it to dry. The machine then precisely cuts the slits in the buttonholes. I remove the fabric from the hoop and carefully remove the stabilizer on the back. That is when I breathe a huge sigh of relief.

  1. Launder the embroidered final fabric:

After completing every embroidery or applique, I launder my piece, as I would the future garment. This insures the design will last. It is a bit scary, but no use rushing to make a garment that features a raveling sloppy design. Again, it may be necessary to go back to step 3, to make the design a bit more robust. Another tip is to always serge the edges of the fabric to reduce fraying before washing and drying it. When it comes out of the dryer, I steam press the design and inspect it to make sure it is still intact.

  1. Cut and Assemble the pattern pieces:

I cut out the pattern piece with embroidery on it first, and then I cut out all remaining pieces needed for the garment. As a safety measure I hand basted some organza scraps over my appliques to protect them during the sewing phase. The changes I made to the Anthea pattern, required changes to the order of assembly. I interfaced both sides of the inside button plackets, interfacing only the back of the folded placket, to preserve drape while adding some reinforcement for buttons and buttonholes. The plackets are then pressed into place. Using a pin, I marked the edge of the Yin-yang buttonholes on the folded interfaced placket which falls behind the embroidery. I considered sewing a welt button, as I learned from Kenneth King’s class, but I could not afford the bulk. Instead I cut the openings like that of a welt on a pocket, cutting along middle with two Y cuts into the four corners, and then hand stitching the edges. I topstitched the front plackets on both front pieces.

Using a French seam, I sew the shoulders WRONG sides together with a scant 1/4“ seam. I trim to 1/8”, and press the seam open. I then turn inside out and sew a ¼” seam, enclosing the shoulder seam. The Anthea blouse pattern calls for ½” seam allowance in most places.

At this point, I diverge from pattern and install the sleeves to the armscye. Choosing to pleat instead of gather. I marked and pinned pleats into the edge of the top of sleeve. Starting with front section, I folded and marked the unpinned front portion of sleeve cap to find the midpoint, and I pin a tiny pleat. I repeat this again to find the pleat in middle of the two sections. I continue placing tiny pleats in the half way points. This results in evenly placed pleats. I continue pleating, and test it against the front armscye. When it gets close I may adjust the depths of some pleats to fine tune the fit. I repeat the process for the back of the sleeve. My preference is to have the pleats facing down or away from the shoulder. I sew the armscye seam. I then turned the seam allowances in and hand stitched them together to form a faux French seam finish. I then use the same process to make the pleats on the bottom of the sleeve. I stitch the pleated sleeve to the sleeve cuff, leaving the last inch on both ends of the cuff, unsewn. The side and sleeve underarm seams are then French seamed. It takes a bit more time, but results in a lovely finish. I then sew the short ends of cuffs together, and complete sewing the cuff onto the bottom of the sleeve. The cuffs are completed as recommended in the original pattern.

  1. Machine sew on 8 machine buttonholes:

The wider placket forces the Yin-yang buttonholes to be 1.5” inches from the edge of the front of the blouse. To keep the blouse closed properly while not distracting from the design, I added 8 internal buttons and buttonholes. On the back placket, I marked 8 buttons, two sets on each side of the placket. There are buttons between the Yin-yang designs, and two more sets below the embroidery. I marked the buttonhole placement lines on the very inside of back placket, as this was most visible. The inside buttons were 14 mm shank buttons as they are easier to button. I placed them 5/8” in from the edge. My machine has a buttonhole function that allows programming the exact size of buttons. I always add .5 mm to the length and .2 mm to the width of the opening, to facilitate, hand cutting the buttonhole slits. I use a small sharp ½” chisel to cut the slits, under a lighted magnifying glass. It really sucks to get old, but I am finding ways to combat the aging process.

  1. Hand sew on 20 buttons:

At this point, I start marking my buttons. I actually loosely hand baste the front plackets together on one side and I start marking button placement using a pin and a Frixion pen. While sewing on the inside buttons to the back of the front placket, I must be careful not to penetrate through to the front of the garment. I am careful to catch only the back facing. The six Yin-yang buttons are sewn through the inside placket. To sew a button, I use double thread, sink a knot on top, make a few reinforcement stitches, stitch the button to the fabric 4 to 6 times, then wrap the thread around the button three times, and stitch through to the back, where I make a few short stitches perpendicular to the original button stitches. In the case of internal buttons which could not penetrate the fabric, I put three locking stitches in the wrapped threads. It results in a neat sturdy button.

  1. Finish the hem:

I button up the shirt and make any necessary adjustments to the center front hem, to guarantee a perfect alignment. I followed the original pattern’s instructions for completing the hem.

And just like that … you have a dreamy blouse to wear. The linen is so soft with beautiful drape. There are a total of 20 buttonholes. Six machine appliqued, embroidered, and cut buttonholes; 6 additional hand sewn buttonholes in the folded front placket facing; and 8 machine sewn buttonholes which were hand cut. This garment is almost as pretty inside as it is right side out. I am inspired to make a double breasted version of the blouse next. I am so proud of this garment, and of myself for creating a design from scratch and executing it from the beginning to the end of the garment making process. At almost 60, I am so very lucky to have the tools I do. But more importantly, I am proud of myself for diving in and learning to use these “new to me” tools and techniques. The Sewing Bee gave me the push I needed, and I am grateful. Thank you to the Sewing Bee committee, the judges, the moderator, and my fellow contestants who make me want to be a better sewist.

P.S. I am willing to share my embroidery design file. It is .ART format, or I could possibly save in other formats. The cut work tool is the last step to the embroidery process, so you can skip that step and hand cut if desired.

Posted on Leave a comment

2022 Sewing Bee – Round 1 – Self Drafted Woven Hoodie

Looking to make a woven hoodie, I fell in love with the Jalie Pattern 2911 Shawl Collar and Pullover Hoodie pattern. There were just two problems. One, it did not accommodate my measurements, and two it was a pattern designed for knits. Undaunted, I studied the pattern pieces. I wanted a crossover front yoke, a soft generous sized lined hood with a draw string, large loose sleeves, and side vents with rounded faced hems.  I wanted a good fit which allowed it be be layered over and under other garments. I envisioned wearing this over a bathing suit on the beach, or over a tee shirt or a turtle neck on a cool night, or perhaps layering a vest over it. Here is the process I used to draft my hoodie. This approach assumes you have a good fitting body pattern to start. I remove all seam allowances from my pattern pieces if they are included.

Starting with my traditional block, which featured a bust dart that went into the armscye, I moved the dart down to the side seam, and then swung it even lower to my waist. I will not describe the dart swing, as plenty of tutorials already exist. I extended the lower leg of the dart to gently curve up and over to the center front. I then drew a second line along the center front seam to the top leg of the dart. This created a front top and front bottom pieces. When the curves of front top and front bottom were joined, they resulted in a lovely shaped front.

Front with drafting lines.

To tackle the hood , I studied the Jalie 2911 hood, which featured a lined hood from a piece cut on fold forming the hood and the crossover yoke. The hood requires cutting two of these pieces on the fold, with the folded edge forming the front edge of the hood and yoke. To start drafting the hood, I drew a line from 2″ in from the center along the front seam (C) to the top inside shoulder seam point (A). This resulted in a 4″ bottom on the yoke. The center front line formed the folded edge of hood/yoke. This was the starting shape of the bottom of yoke/hood piece. I traced the yoke shape onto new paper. To accommodate a crossover on the yoke piece, I added an inch and a half to the folded edge. This gives a generous 3″ overlap to front yokes. I drew a line out at an angle, making sure this was same length as half of back neck seam (A to B). I then completed the hood by drawing up and over to the folded line. Check the resulting shape of the hood and yoke to be sure you like the final lines. I made several muslins of the hood and yoke, testing the shape of the hood and the crossover on the yoke. I have included some drawings to help visualize the formation of the pattern pieces. Be sure to check seam lengths to be sure your pieces will fit together smoothly during construction. Also, do not forget to all in your seam allowances before cutting.

Pattern pieces are NOT to scale.

For years, I have struggled to draft sleeves for my sloper. My sleeves always appeared to be slightly tweaked, with subtle wrinkles that I could not get rid of. The sleeves were always a bit awkward to get on and off, and there was excess fabric pooling in my side chest area in front of the armscye. Although I have large biceps, my chest is average. I bought the Cashmerette’s Vernon Shirt pattern the moment I read “full bicep option”.

To address my need for a sleeve that accommodates my large biceps, I used the size 26, cup C armscye, and sleeve pattern, view A from Cashmerette’s Vernon shirt pattern. To do this I traced just the armscye from top front shoulder to under arm side seam point, being sure to include a grain line parallel with center front. This is just a partial trace. I then placed it on my sloper at top shoulder point, and keeping the grain lines parallel. I then marked the new armscye onto my sloper. I adjust the side seam to meet the new end of front armscye. Next, I repeat the process for the back. There is added complexity of the yoke. I pinned the back yoke, and back pattern pieces from Vernon shirt pattern together, before tracing the back armscye. The back of my sloper had a yoke, so I pinned my yoke and back piece together. I aligned the shoulder points, and kept the grain lines parallel. I drew the new armscye on my back sloper. I adjust the side seam to meet with back armscye. This may require cutting or adding pattern paper to your sloper pattern pieces. Always work with a copy, not your original sloper. Be sure to align the front and back side seams to make sure they are same length. It is important that this drafting is done without seam allowances. You must remove seam allowances from Vernon shirt pattern pieces, before tracing. Seam allowances must be added after all adjustments are made. It is work, but it resulted in a gorgeous looking and comfortable fitting sleeve. Once I completed this, I now have sleeves for my sloper that drape beautifully, fit comfortably, and can be the basis for many happy future hacks.

When drafting a pattern, you must also develop an assembly plan. Ordering the construction, finishing the internal seams, grading areas of bulk, and reinforcing any stress points are just a few things to keep in mind. I truly appreciate the many details that go into a well-developed pattern. While making muslin, I creating my assembly instructions.

For cutting, you cut two hoods on fold, two front side pieces, one front bottom piece on fold, one back bottom piece on fold, and two back yokes. I slid my back piece away from fold to allow for two 1 inch back pleats. From the Vernon Shirt pattern you cut two sleeves, two bias binding pieces for placket, and two cuffs.

The construction is straightforward. I pleat the back bottom, then sew both back yokes to back bottom. I sew the front side pieces to back yoke. Using burrito method I enclose the back yoke along the shoulder seams, and top stitch. The hood is two pieces on a fold. I unfold and sew the two hoods right sides together, along the back of neck to top of hood, and back to the opposite back of neck. I finished and graded the hood seam. I interfaced where the grommets to be placed for drawstring, and also at the point where the hood meets the shoulder seam. I then turned the hood, with wrong sides together resulting in a great lined hood with a crossover front yoke.

Hood/Yoke pieces prior to sewing the seam.

I installed a couple of 7 mm grommets, to allow for cinching the hood. I top stitched a channel for the drawstring along the folded edges of the hood. I sew one side of hood to the front side piece along the yoke, around the back neck, and on to opposite front side piece. The other layer of hood is pressed and sewn to enclose the yoke area, after seams are graded. I then attach the front bottom. At this point I follow the directions for the sleeve, View A from Cashmerette’s Vernon shirt to guide me through finishing and attaching the sleeve. The sleeves are sewn on first, then the sleeve seam and side seams are sewn and finished with a French seam. The narrow cuffs were then added according to Cashmerette’s Vernon instructions. I applied a sewn on hem facing for the bottom hem, which enhanced the drape. I did not include these instructions, but many tutorials exist for drafting a hem facing. I installed a size 14 fashion snap on each of the narrow cuffs, and an 8mm rivet above each side vent. I finished up by adding the drawstring using parachute cord and some pretty beads.

Beautiful and comfy Vernon Shirt Sleeves, view A from Cashmerette.

It was a very straight forward project after establishing the pattern and assembly instructions. Again, I must acknowledge Jalie Pattern 2911 Shawl Collar and Pullover Hoodie and Cashmerette’s Vernon shirt which inspired and aided me in developing the pattern for this garment. I could not help but smile while I was being photographed in this garment. I know it is one garment I will be wearing throughout spring, summer, and fall for years to come.

Loving my new hoodie!
Posted on Leave a comment

Buying Knit Fabric Online

I avoid buying fabric online. I am lucky to have half a dozen fabric stores within a days travel. But unfortunately my local fabric stores offer very limited knits. With all the amazing knit patterns available, I recently dipped my toe into the world of online fabric shopping.

I must clarify that I have a strong loyalty to durable easy care natural fibers. Machine wash and dry, and heavy preference for quality natural fibers. I am also cheap. But, over time I am starting to spend more money per yard but buy less fabric. So, here are my findings…

UPDATED 2/16/2022

I purchased 3 three yards pieces of the Cotton Lycra from KnitFabrics. com. This cotton lycra is ever so slightly thinner and curlier than the cotton spandex from Nick of Time Fabric. The advantage is the availability of this fabric is more stable. I made a tee shirt with the maroon. Another interesting note is the order is placed in half yards. The price was comparable to other places. It has flat shipping rate for US. I pre-washed and tumble dried my yardage. I then used the Apostrophe Pattern’s MyFit Tee to generate a custom tee shirt pattern for myself using a considerable number of my measurements. I selected the relaxed fit, and added several inches on to bottom to have it border on becoming a tunic. I cut it out for low crew neck, and long sleeve. I wore the tee shirt several times and laundered it in between. I have to say I love the results. It handles my shoulder fit, large biceps, and pear shape figure beautifully. With the exception of maybe adding an inch to my sleeve (more personal preference), I will make no further adjustments. I will be attempting another with the high crew neck, and the sleeveless option. I am tempted to try the semi-fitted next time, but that will require printing another pattern. Another adventure was using my double fold knit binder attachment for my cover stitch machine for the first to finish the neckline. I spent a whole day experimenting and practicing and managed one passable neckline. Not sure about the attachment yet. But, I will keep practicing and decide how I feel about the end results with another few attempts. Here is the MyFit Tee in the Cotton Lycra from KnitFabric.com.


Nick of Time Fabric offers some dreamy cotton spandex. At the time, I bought three fabrics, two 12 oz and a 10 oz. I washed and dried them as I would garments, and I loved sewing with them. The 12 oz had little to no curl, and sewed up like a dream. My serger and cover stitch machines loved them. Little to no drama. The recovery on 12 oz is superb. No cuff just a simple single turn hem and I can pull sleeves up and down with no bagging. I really find this fabric makes a super comfortable shirt. The cotton spandex was pretty picked over, and I am not sure about restocking, but I will keep and eye out for these in future.


Cotton Spandex from Nick of Time Fabrics. Pattern is Muna and Broad’s Tarlee Tee Shirt.


Cotton Spandex from Nick of Time Fabrics. Pattern is Muna and Broad’s Tarlee Tee Shirt.


Stonemountain & Daughter Fabrics was my next stop. I purchased several knits, which I have not sewed up yet. The yoga cloth is my favorite. The yoga cloth is cotton spandex, machine wash and dry low.  This fabric is thin but dense. It feels like cotton, with excellent recovery. My plan is to make leggings with these fabric. I will update this post when I have accomplished this, and wash and worn them a few times. Another selection I made was the ponte leggaro, which is a rayon/nylon/spandex blend. It is machine wash and dry low. It is much softer feel with an supple drape. I have no idea what I will make with this fabric. I am thinking a dress, blouse, or anything calling for a knit with significant drape. I believe this will have excellent recovery. I gambled on a piece of activewear knit which is a polyester / Lycra blend. This piece has a soft synthetic feel. It feels substantial and I will use this for my workout tops. By giving up the cotton I gain excellent wicking and recovery.

Yoga Cloth from Stonemountain & Daughter


Activewear Knit from Stonemountain & Daughter


I also purchased two surprise packs from Discovery Fabrics. I really hesitated as the shipping from Canada was very high. But, I wanted a source for more technical knit fabrics. The prices are higher but again the value is in the technical qualities of their offerings. I purchased a Legging pack and a Panty pack. Originally, I was most interested in making my own leggings. But, with my increasing amount of scraps I thought I might venture into panty making. The power stretch jersey were machine wash and tumble dry low. It has a definite synthetic feel, but the trade off is durability and range of motion. The power stretch is composed of a blend of nylon, polyester, and spandex. The only other offering from panty pack that I might be tempted to try is the chitosante, which is environmentally friendly polyester, with a beautiful hand. It is antibacterial, odor resisting, moisture wicking, breathable, fast-drying, anti-static, pill resistant and has UPF 50. The recommended care is hand wash and hang to dry, which is slightly out of my comfort zone. I also noticed an odor from this piece, and wonder if laundering will remove it. But, for the added benefits really tempted me. It has a softer synthetic feel but approaches a cotton feel. The rest of panty pack is has manufacturer suggestion of machine or hand wash with hang to dry, which I will probably pass along. The prices at Discovery are definitely higher but again these are performance and technical knit fabrics. Again, I have not sewn these up, but will update as I get these sewn up and washed and worn.

Chitosante from Discovery Fabrics – Hand Wash and Hang to Dry