
Buttonholes!!! Buttonholes! Okay, my first reaction was a bit panicked. Deep breaths. Read again. Buttonholes. “Sew an article of clothing with the buttonhole(s) being the primary focus.” It would be very easy to allow other elements such as the buttons, or the button band to become the focus of this garment. I wanted the buttonhole to be the star of the show!
I started panicking again. I kept re-reading the blog post and this statement stuck in my mind. “One of the things we encourage in this contest, is to think outside the box and to overcome some fears and challenges, while still trying to remain true to your own aesthetic.” This is precisely why I participate in the Sewing Bee. What would be my personal buttonhole challenge? Buttonholes are usually a pretty straightforward part of a project. I have no fear of machine buttonholes. I am grateful for my machine and its ability to reliably get the job done. I have done many bound buttonholes, including 17 hand sewn bound buttonholes on a denim jacket in a previous sewing bee challenge. I decided to focus on machine embroidery! I discovered there are many buttonhole embroidery designs available for purchase, but I wanted to challenge myself to digitize my own design from scratch. The design would incorporate a buttonhole. Furthermore, I wanted my machine to cut the buttonhole slit for me, as part of the embroidery project using my cut works attachment. Having limited embroidery digitizing experience and even less experience with my cut work tool, I was feeling sufficiently challenged.
My steps to complete the project were as follows:
- Select a garment pattern to be the home to some awesome buttonholes:
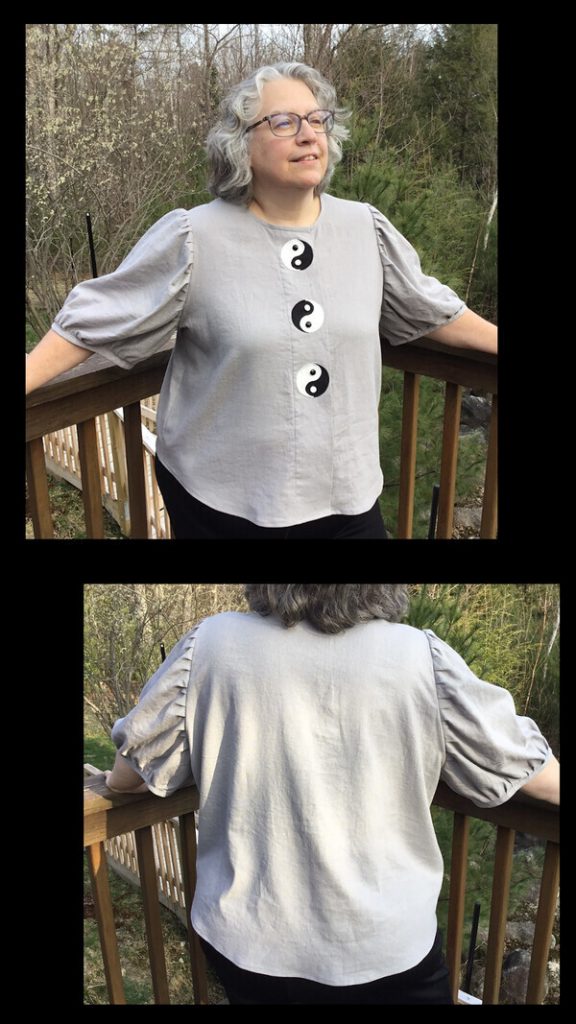
I choose the Anthea Puffed Sleeve Blouse by Anna Allen Sewing Patterns. I had made one before and it is a favorite garment. The Anthea Puffed Sleeve Blouse pattern is designed to be a swing top. Having studied the finished measurements, I determined the pattern would accommodate my pear shaped figure, and eliminate the need to grade out from bust to waist. This blouse offers great arm coverage, a sweet curved hem and in the right fabric, a wonderful swish. I made a straight size 22, but had to redraft the front piece to accommodate a 2.25 inch increase in the cut on button placket. With a 3 inch button placket, the buttons would now be 1.5 inches in from edge. With such a light fabric, this required the addition of concealed inside buttons and buttonholes which were closer to the edges of the button plackets, to keep the front panels closed and to prevent sagging. Another excellent opportunity to showcase the importance of buttons and buttonholes!
The original pattern is great, but I decided to refine some of the finishes. The gathering on the top and bottom of sleeves were to be replaced with pleats. French seams were to be used on the shoulders, sleeves, and sides. The armscye was to be turned and finished by hand, to give a faux French seam look. The pattern recommended a light to medium woven. I chose a medium weight linen, which was strong enough to support the applique and embroidery but still had sufficient drape. For this reason, much more attention had to be given to grading. Finally the changes to the pattern and finishes, along with the machine applique required significant reordering of the assembly instructions.
- Choose a design:
My aesthetic is classic, relaxed, comfortable, and uncomplicated with a touch of quirky. My buttonhole design had to be simple. Nothing over the top or too fussy stuff allowed. The buttonholes had to be the main focus of this garment. One of my favorite symbols is the Yin-yang, which represents a dynamic balance of opposing but complementary and interconnected forces. The Yin-yang symbol is both classic and uncomplicated with a bit of quirk. Small white and black round buttons would complete the design.
- Create a design in embroidery software:
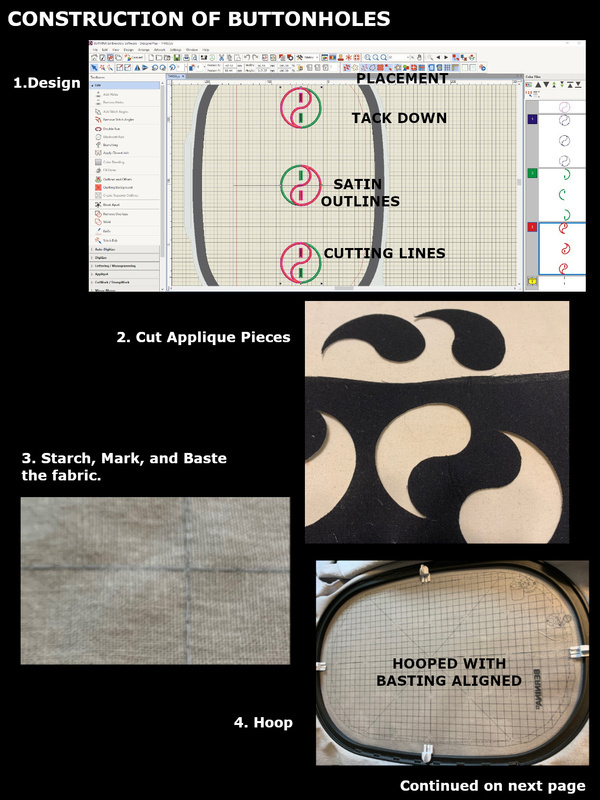
I used Bernina Embroidery Software – Designer Plus Version 9. To digitize a Yin-yang symbol, I created a digitizing template, by drawing a 2.5” circle with two 1.25” circles stacked inside to form an 8 inside. If you squint, you can see the outlines of the Yin-yang symbol. My original intent was to embroider the whole design. The problem was the garment I chose to make required a light to medium weight fabric with good drape. The embroidery design if too dense would interfere with the drape on such a fabric. I completed a beautiful all embroidery design of the Yin-yang but due to its stitch density it was not going to work with the current planned garment. It is destined for a denim shirt soon! Reducing the density resulted in a less visually pleasing design.
Discouraged but not defeated, I switched directions and created a machine applique design with buttonholes embroidered on top. The cut work tool would be used in part of the design to cut my buttonhole slits. This eliminates the nerve-wracking step of cutting open buttonholes by hand. Switching to applique presented several new challenges. About a year ago, I took a wonderful class from Teri Hall from 2 Many Lizards, but that was the only machine applique design experience I had. The software can generate a .SVG cut file from the applique design which then can be used on a cutting machine.
I struggled with an updated version of the design software. Offsets, underlays, outlines, overlaps, sequencing, and fills were some of the many considerations. Thomas Edison is quoted as saying, “I never once failed at making a light bulb. I just found out 99 ways not to make one.” This sums up my experience with creating my first applique design from scratch. I learned so much in the past week. In the end, I am so proud of my Yin-yang buttonhole machine applique design.
- Prepare the pieces to be appliqued:
Using linen for both the garment and the applique pieces allowed the drape to be maintained and would guarantee the linen garment would be compatible with the applique during future laundering. I had never cut linen using my cutting machine, and it is NOT the same as cutting quilting cottons. I had to experiment and finally settled on the same blade and settings as cotton except for the force setting which increased by 3. I have a Silhouette Cameo 4. To prepare for cutting, I heavily starch my fabric pieces. I then apply Steam a Seam 2, Lite on the back. I remove the paper backing. I then run this through my cutting machine. I needed one white and one black curved tear drop shape, per applique.
- Test sew the design:
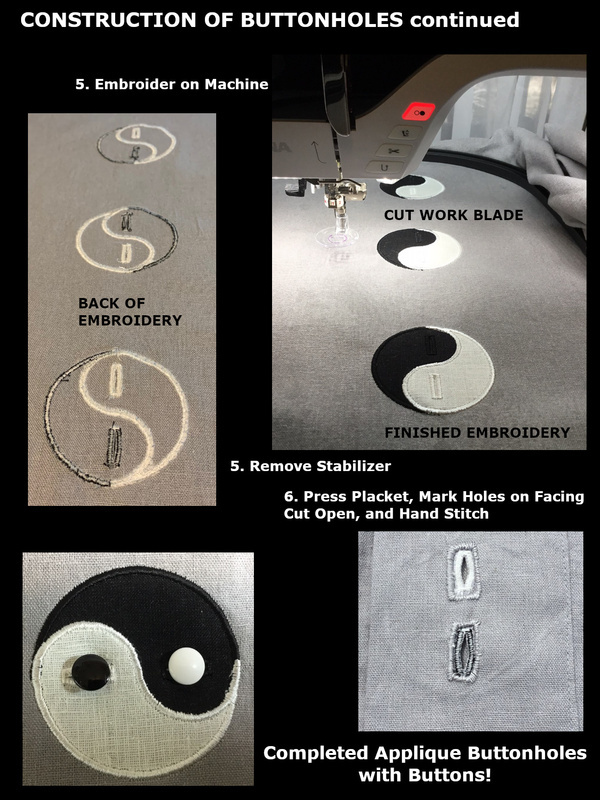
This was the most time consuming step in the entire process. I needed to decide on the right combination of garment fabric, the stabilizer used during embroidery, and the thread. When inevitably something went wrong, such as catastrophic thread build ups, insufficient coverage on the edges, and base fabric distortions, I would go back to step 3, and refine my design. The stabilizing, sequencing, layering, and density, had to be taken into consideration. I settled on using OESD Ultra Clean and Tear stabilizer under heavily starched fabric. The stabilizer was easily removed and left very little residue, which will completely dissolve during future launderings. I used polyester embroidery threads Isacord 40 wt black, and Floriani PF730 off white. I slowed my machine down significantly while embroidering. After getting several successful test pieces, I knew I had a reliable and repeatable combination.
- Sew the design on to final fabric:
I always start by pre-washing and drying my fabric. With linen, I often repeat it twice. I cut out a piece of garment fabric large enough to accommodate the piece to be embroidered with 4 inches extra on all sides. In this case, I am embroidering along the center front of the wearer’s right front piece. I marked the center front, making sure it was on grain. I then marked the placket, and the tops of the embroidered pieces on the back of the fabric. I then basted the center front line and short perpendicular lines at the tops of the embroidery using my sewing machine, set on a very long stitch and with reduced tension. The basting allows me to easily align my design on the front of the fabric, while being easy to remove prior to embroidering, and leaving no visible markings on the front. I then heavily starched my fabric. I hoop the starched fabric with the stabilizer underneath, making sure the center front line is parallel in the hoop. I decided on embroidering 3 Yin-yangs, with the centered one flipped to add some movement to the overall design. After the machine is positioned to embroider in the correct position, I remove my machine basting. The embroidery process is a bit more involved with applique. The machine will first sew placement lines and then stop. I carefully remove the hoop from the machine keeping the fabric hooped, and place my applique pieces according to the placement lines. I lightly press them with a small iron to set them in place with the Steam and Seam 2, Lite. The hoop goes back on the machine, and continues to embroider the edges of applique with a satin stitch. It then stitches the buttonholes. When all embroidery is complete, the machine stops and requests the cut work tool be installed. Before proceeding, I apply fray check on my buttonholes, and wait for it to dry. The machine then precisely cuts the slits in the buttonholes. I remove the fabric from the hoop and carefully remove the stabilizer on the back. That is when I breathe a huge sigh of relief.
- Launder the embroidered final fabric:
After completing every embroidery or applique, I launder my piece, as I would the future garment. This insures the design will last. It is a bit scary, but no use rushing to make a garment that features a raveling sloppy design. Again, it may be necessary to go back to step 3, to make the design a bit more robust. Another tip is to always serge the edges of the fabric to reduce fraying before washing and drying it. When it comes out of the dryer, I steam press the design and inspect it to make sure it is still intact.
- Cut and Assemble the pattern pieces:
I cut out the pattern piece with embroidery on it first, and then I cut out all remaining pieces needed for the garment. As a safety measure I hand basted some organza scraps over my appliques to protect them during the sewing phase. The changes I made to the Anthea pattern, required changes to the order of assembly. I interfaced both sides of the inside button plackets, interfacing only the back of the folded placket, to preserve drape while adding some reinforcement for buttons and buttonholes. The plackets are then pressed into place. Using a pin, I marked the edge of the Yin-yang buttonholes on the folded interfaced placket which falls behind the embroidery. I considered sewing a welt button, as I learned from Kenneth King’s class, but I could not afford the bulk. Instead I cut the openings like that of a welt on a pocket, cutting along middle with two Y cuts into the four corners, and then hand stitching the edges. I topstitched the front plackets on both front pieces.
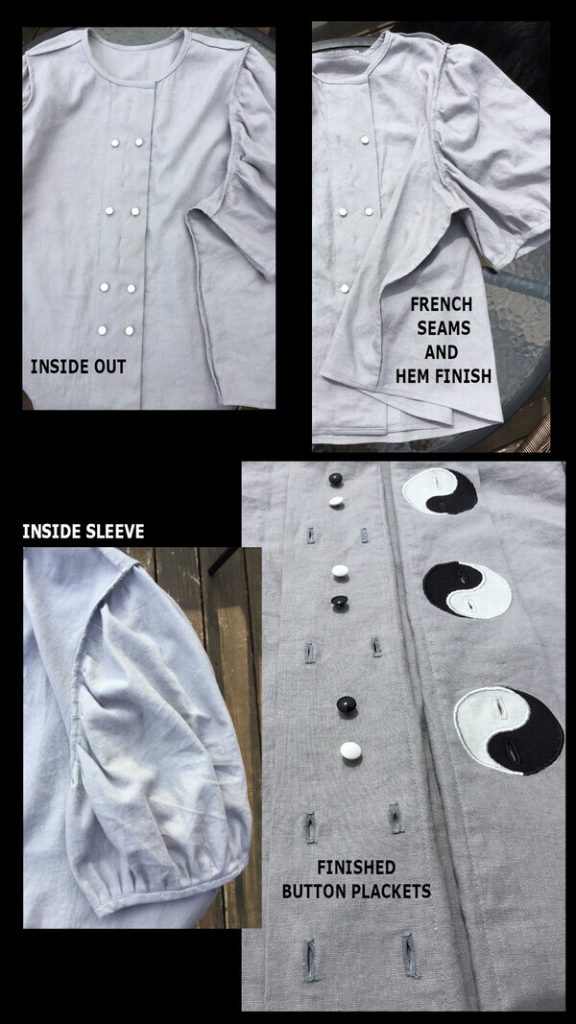
Using a French seam, I sew the shoulders WRONG sides together with a scant 1/4“ seam. I trim to 1/8”, and press the seam open. I then turn inside out and sew a ¼” seam, enclosing the shoulder seam. The Anthea blouse pattern calls for ½” seam allowance in most places.
At this point, I diverge from pattern and install the sleeves to the armscye. Choosing to pleat instead of gather. I marked and pinned pleats into the edge of the top of sleeve. Starting with front section, I folded and marked the unpinned front portion of sleeve cap to find the midpoint, and I pin a tiny pleat. I repeat this again to find the pleat in middle of the two sections. I continue placing tiny pleats in the half way points. This results in evenly placed pleats. I continue pleating, and test it against the front armscye. When it gets close I may adjust the depths of some pleats to fine tune the fit. I repeat the process for the back of the sleeve. My preference is to have the pleats facing down or away from the shoulder. I sew the armscye seam. I then turned the seam allowances in and hand stitched them together to form a faux French seam finish. I then use the same process to make the pleats on the bottom of the sleeve. I stitch the pleated sleeve to the sleeve cuff, leaving the last inch on both ends of the cuff, unsewn. The side and sleeve underarm seams are then French seamed. It takes a bit more time, but results in a lovely finish. I then sew the short ends of cuffs together, and complete sewing the cuff onto the bottom of the sleeve. The cuffs are completed as recommended in the original pattern.
- Machine sew on 8 machine buttonholes:
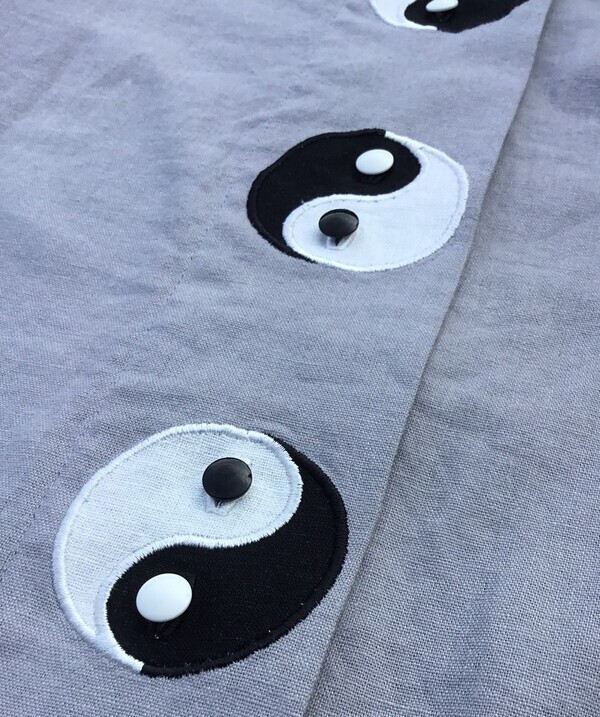
The wider placket forces the Yin-yang buttonholes to be 1.5” inches from the edge of the front of the blouse. To keep the blouse closed properly while not distracting from the design, I added 8 internal buttons and buttonholes. On the back placket, I marked 8 buttons, two sets on each side of the placket. There are buttons between the Yin-yang designs, and two more sets below the embroidery. I marked the buttonhole placement lines on the very inside of back placket, as this was most visible. The inside buttons were 14 mm shank buttons as they are easier to button. I placed them 5/8” in from the edge. My machine has a buttonhole function that allows programming the exact size of buttons. I always add .5 mm to the length and .2 mm to the width of the opening, to facilitate, hand cutting the buttonhole slits. I use a small sharp ½” chisel to cut the slits, under a lighted magnifying glass. It really sucks to get old, but I am finding ways to combat the aging process.
- Hand sew on 20 buttons:
At this point, I start marking my buttons. I actually loosely hand baste the front plackets together on one side and I start marking button placement using a pin and a Frixion pen. While sewing on the inside buttons to the back of the front placket, I must be careful not to penetrate through to the front of the garment. I am careful to catch only the back facing. The six Yin-yang buttons are sewn through the inside placket. To sew a button, I use double thread, sink a knot on top, make a few reinforcement stitches, stitch the button to the fabric 4 to 6 times, then wrap the thread around the button three times, and stitch through to the back, where I make a few short stitches perpendicular to the original button stitches. In the case of internal buttons which could not penetrate the fabric, I put three locking stitches in the wrapped threads. It results in a neat sturdy button.
- Finish the hem:
I button up the shirt and make any necessary adjustments to the center front hem, to guarantee a perfect alignment. I followed the original pattern’s instructions for completing the hem.
And just like that … you have a dreamy blouse to wear. The linen is so soft with beautiful drape. There are a total of 20 buttonholes. Six machine appliqued, embroidered, and cut buttonholes; 6 additional hand sewn buttonholes in the folded front placket facing; and 8 machine sewn buttonholes which were hand cut. This garment is almost as pretty inside as it is right side out. I am inspired to make a double breasted version of the blouse next. I am so proud of this garment, and of myself for creating a design from scratch and executing it from the beginning to the end of the garment making process. At almost 60, I am so very lucky to have the tools I do. But more importantly, I am proud of myself for diving in and learning to use these “new to me” tools and techniques. The Sewing Bee gave me the push I needed, and I am grateful. Thank you to the Sewing Bee committee, the judges, the moderator, and my fellow contestants who make me want to be a better sewist.
P.S. I am willing to share my embroidery design file. It is .ART format, or I could possibly save in other formats. The cut work tool is the last step to the embroidery process, so you can skip that step and hand cut if desired.