
Sewing Bee Round 3 – Cargo Bottoms Entry
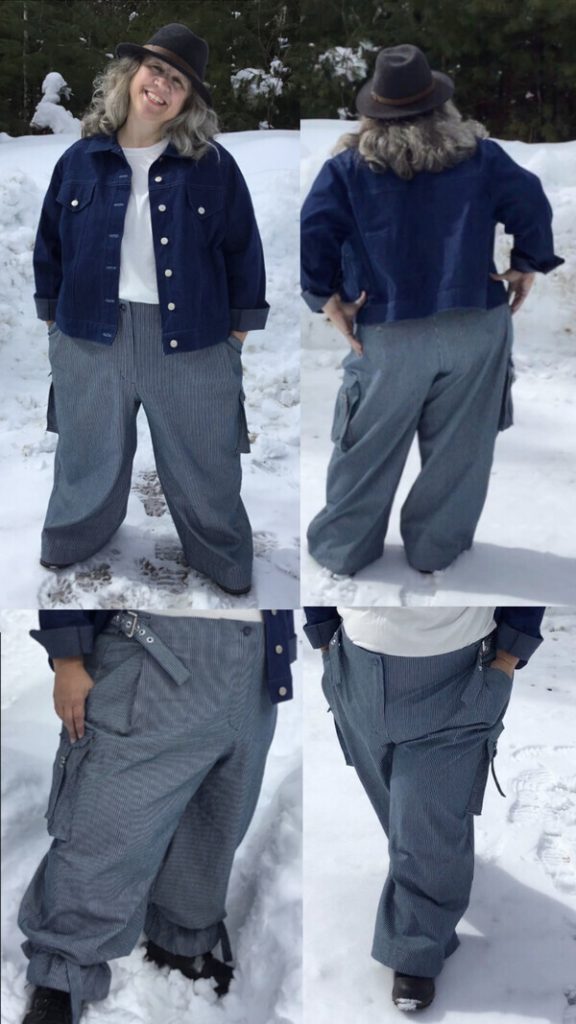
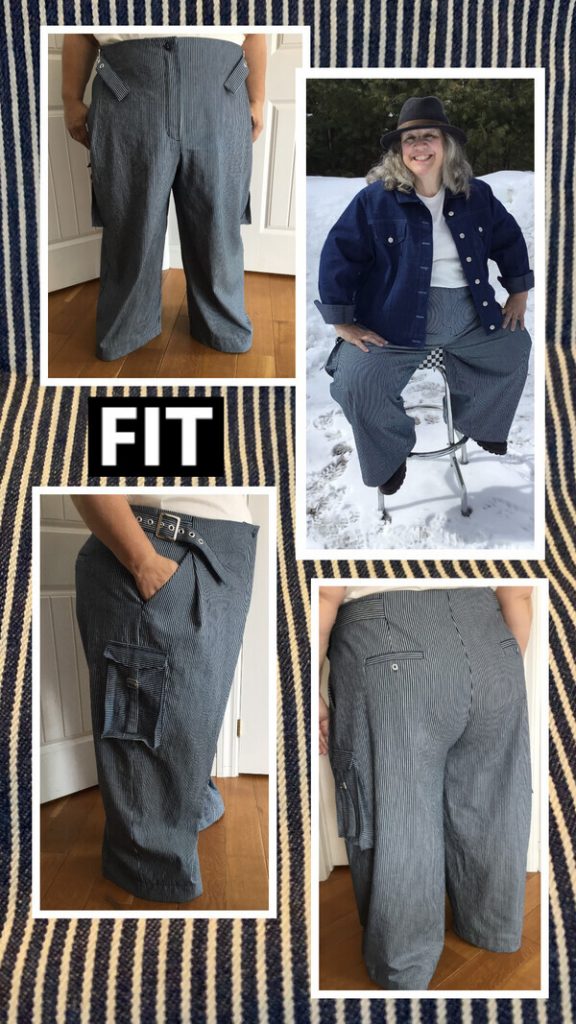
At the beginning of every Sewing Bee Round, I compare the challenge to my sewing to-do list. The challenge was cargo bottoms, and on top of my sewing to-do list was, make another pair of Mitchell Trousers by Closet Core Patterns. The Mitchell Trousers pattern released last fall, and I had my first pair made within weeks. I had fallen in love with the Pietra Pants and Shorts pattern also by Closet Core, and I was hoping to achieve the same great fit with the Mitchell Trousers, which I did and without elastic! To make the Mitchell Trousers more cargo I would add some cargo pockets, use a sturdier fabric, amp up the strap factor, make the wide leg version but with a way to cinch them, and replace the waist adjustable slides with belt buckles and some eyelets.
The Plan
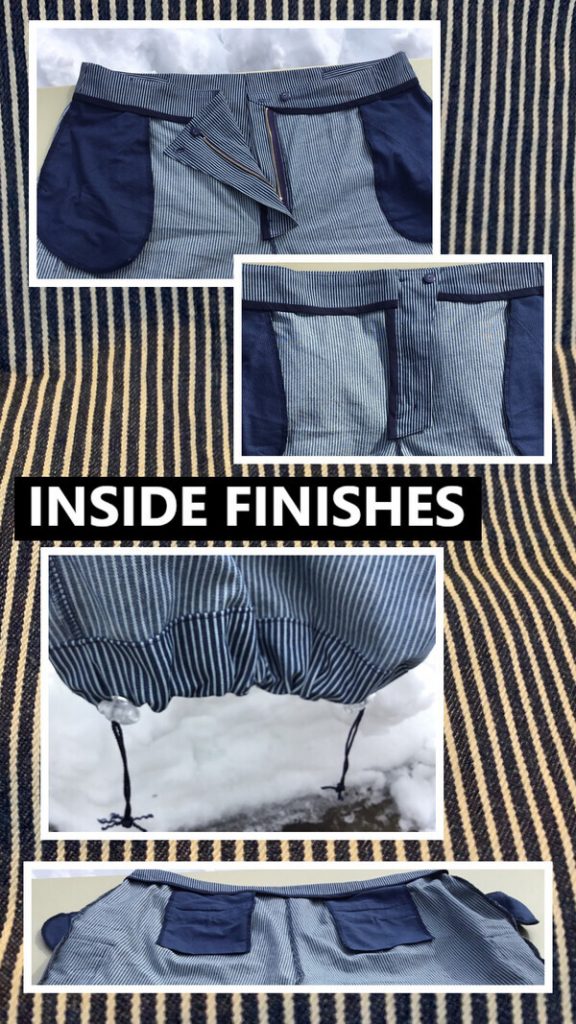
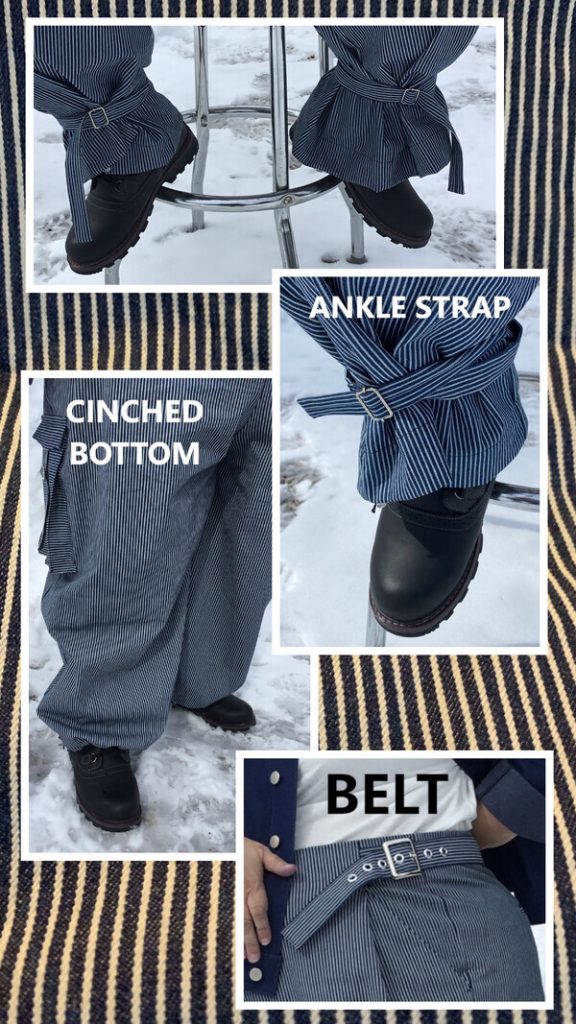
My first pair of Mitchell Trousers was a straight size 28, with a slight extension to front and back crotch curves. I also removed 4 inches from the legs. They were a perfect fit in the back but the front was still a bit big. After examining the pattern I realized I could use a smaller size 26 front, with the larger size 28 back, and all notches would still match along the side seams. Replacing the adjustable slides in the waist band with belt buckles would allow a more robust fit, but would result in the straps falling forward. I decided to lean into the strap factor. The strap would also need eyelets. I had never made a belt before. My first pair of Mitchell Trousers was the tapered version, but the wide leg version would more easily accommodate the addition of cargo pockets which would straddle the side seam and close with a strap and adjustable slide. Not having worn wide leg pants since high school, this choice was a bit outside my comfort zone, so a way to cinch the wide leg pants would be added. The pattern also comes with great slash pockets and two welt pockets in the back. The bottom of the pant leg would have a drawstring with cord locks to cinch the leg. To amp up the strap factor, I made ankle or leg belts which wind around my leg twice and then are cinched with another 1 inch adjustable slide, making a nice puffed cuff look when I want to tame the wide leg and add a bit of wow.
Pattern and Supplies
The Mitchell Trousers pattern is an intermediate sewing pattern. Markings are critical to a successful assembly. I followed instructions closely, and highly recommend this pattern for its excellent design, drafting and instructions. There are optional welt pockets, which I love! The front features a pleat that falls just in front of a slash pocket. The pleats along with the waistband design allow the pants to fall so nicely when standing, yet expand when sitting to make them comfortable in both positions. The material I chose is a deep stash, striped medium weight denim. The stripes add verticality to the garment. The sewing and assembly is a bit more challenging in the heavier weight fabric. It is 54” wide and I used just under 4 yards. I used about half a yard of sturdy cotton for lining. Due to the stripes, I cut each pattern piece separately to honor the grainline and opted to minimize the topstitching. The following hardware was used:
Two 1.5 Belt Buckles
Eighteen .25 Eyelets for belting and cinching
Four 1 inch adjustable slide buckles for pockets and ankle straps
Cording for cinching
4 cord locks for cinching
Interfacing for waistband
7 inch jeans zipper (pattern calls for 8 inch but 7 inch worked fine)
2 large buttons for front closure
2 small buttons for welt pockets
2 Rivets for belt
Modifications
Installing belt buckles is somewhat more involved than installing adjustable slides. Start with a slightly longer strap than the pattern piece Q. Assemble the strap as instructed through edge stitching. It will be cut down to the correct size after the belt buckle is attached. Before installing the buckle, an eyelet is installed in the center of the strap. The prong of the belt is inserted into the eyelet, and both straps are folded in half inside of the buckle. It is important to secure the straps together close to the bar. The distance between the bar and the point of the attachment must be shorter than the prong, to avoid the prong slipping out of the eyelet. This can be tricky to sew on a sewing machine. I opted to install a rivet instead. Trim the belt buckle strap to the patterns original size (piece Q folded in half). Make sure the buckle is right side up, and the prong is pointing toward the side seams before sewing it in place. After the pants are assembled you must mark the point where the prong and the front of the buckle meet on the back waist band straps. This is the point of the first eyelet. I used 1/4 inch eyelets, placed one inch apart. I added several before and after my original mark to allow for adjustments and for accents. The waist adjustments really help make these pants incredibly comfortable. The adjustable buckle slides or D rings are called for in the pattern, but belting gives it a more robust feel and look which the denim can support.
I prefer that ankle straps wrap around twice, with a bit to dangle. For my ankle straps, I measured the length to wrap around my leg or ankle, then doubled and added several inches. This is the length of the strap. I cut a 2.75” wide strip to my calculated length. I stitched a 3/8th inch seam, and pressed the seam open and centered. I stitched one end closed, and turned the strap. I edge stitched around, and then sewed on a 1 inch adjustable slide buckle as per the instructions.
For the bottom of the leg cinch, I installed two ¼ inch eyelets near the side seams and lower edge of the inside hem of pants. I fished the cord between the two eyelets, made a loop long enough for knotting, installed a cord lock, and then fished the cord back to first eyelet. I then installed a second cord lock. I made the cord locks just long enough to allow the hem to be its full width, and then knotted and trimmed the cording. Using cord locks on both side of the pant leg reduces the length that the drawstring hangs when cinched.
Cargo Pockets
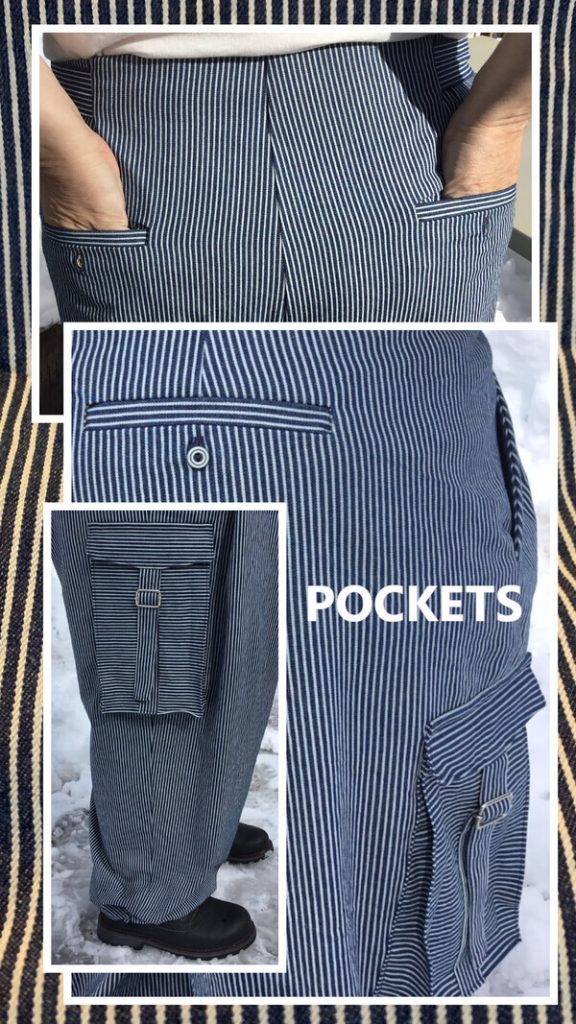
The pockets were inspired by the You Tube, “How to sew box pocket | Cargo pocket | Box pocket with loop” by Taylor 4u. This video has no instructions or voice over. After watching it a half a dozen times, I drafted my pattern cutting the main pocket piece 10 by 12.5 inches. Mark a top and bottom. I finished the sides and bottom with a serger. For the top, fold over ¾ inch press, then fold over again, and stitch down. Mark (removable) a centered 1 by 8.5 inch rectangle starting at the bottom of the pocket piece. Cut a 1.75 by 10 inch strip. Press 3/8 inch over both long sides of the strip, then starting at bottom of pocket, align it against the marked rectangle and stitch up 6.5 inches. At this point install the adjustable slide buckle, and finish stitching the strip down using the marks as guides. The top of the adjustable slide buckle should fall 2.5 inches below the finished top of pocket. Press 2 inch down on the 3 unfinished edges. Cut 1.75 inch square out of each of the lower corners. Fold right sides together and stitch (or serge) the bottom seams. Fold wrong sides together along the 2 inch pressed edges and stitch a 1/8 inch edging. Make a template of this finished front, and use this to mark the placement on the garment. My pocket finished at 5.75 by 8.75 inches. I pressed the edges over 3/8th of an inch and then pinned, basted, and then stitched the pocket in place on the garment. I stitched the top of pocket down for ¾ inch on both sides. Make two 7.5 by 1 inch long straps just like the ankle strap.
The flap starts by cutting a 2.75 by 6.75 rectangle and trimming the corners to accommodate the 1 inch strap. Baste the strap onto the piece with right sides together. I placed this on larger scrap, with stripes aligned and stitch a 3/8 inch seam around the sides and bottom of flap. I graded and turned the flap, and edge stitched the flap. The flap is sewn down to the garment with a ¼ inch seam, ½ inch above the pocket, with right sides together and facing up away from pocket. Press the flap down into place and stitch 3/8 in from folded edge, being sure to enclose raw edges of the top of the flap. Backstitch to reinforce. I choose to place my cargo pockets centered along the side seams of pants, and ending just above where my knee bends.
Conclusion
I love my wide leg cargo pants. The proof is that after the taking the photos, I wore them the rest of the day. I prefer them cinched at bottom for around the house. I like the ankle straps when stepping out. I love the comfort of the wide leg. These may replace my joggers as my go to comfort pants.
My outfit for the photos are: the jean jacket is a Seamwork’s Audrey that I made years ago, a brand new white organic tee shirt (so incredibly comfy), Wool hat purchased in Innsbruck, Austria, and my snow boots because it has not stopped snowing for the last 10 days or so. The incredibly beautiful sunshine is courtesy of Mother Nature, so grateful!
And as always I want to express my appreciation to the Pattern Review community, the judges, the sponsors, the contest manager, mudcat, and most of all to my fellow contestants.
Pattern Description:
Wonderful woven trouser pattern featuring adjustable waistband, slash pockets, front pleat, optional welt pockets with both tapered and wide leg options.
Pattern Sizing:
They offer two size bands 0 to 20 and 14 to 32, which accommodates 53 inch waist and 63 inch hips.
Did it look like the photo/drawing on the pattern envelope once you were done sewing with it?
Absolutely!
Were the instructions easy to follow?
Yes and No. The instructions were excellent but this is an intermediate pattern and it does assume a fair amount of experience. To confess, I took an online class/sew along offered by Pintuck and Purl in New Hampshire and taught by Sarah Joiner. Really enjoy her classes. This reduced my stress factor but I think I could have managed it on my own.
What did you particularly like or dislike about the pattern?
Love the pleat that falls just next to slash pocket. Love the shaping of the back. I just got an amazing fit. It is clever design.
Fabric Used:
Striped medium weight Denim bought years ago.
Pattern alterations or any design changes you made:
Yes, a few see details in my sewing bee write up.
Would you sew it again? Would you recommend it to others?
Yes, and Yes. I have a black satin cotton twill that I am making it in next. I might try to do a leg somewhere in between the taper and wide leg.
Conclusion:
If you love the Pietra pattern, you should definitely give the Mitchell Trousers a go!
