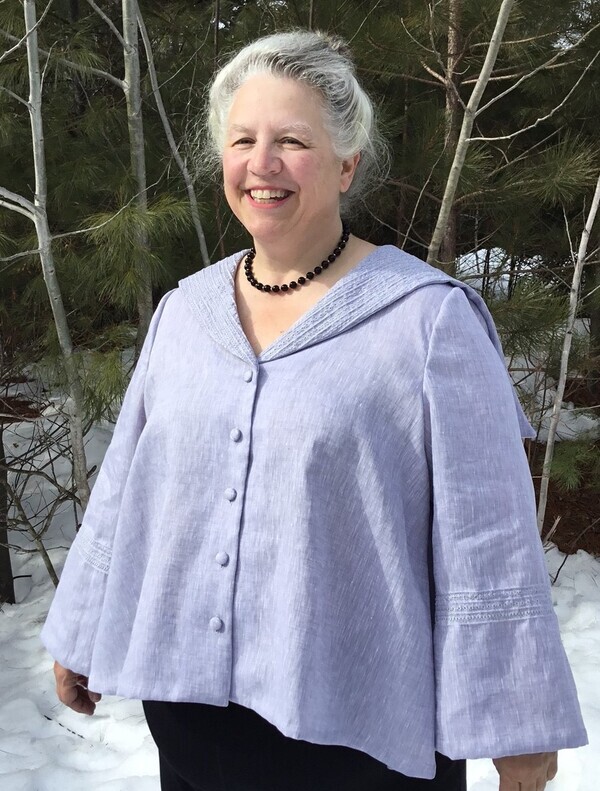

Collars!
As a short-necked person, I mostly avoid them. Continuing in my exploration of new embellishment techniques, I wanted a flat collar with plenty of room to show off some pretty stitches. The Metro Middy blouse pattern from Folkwear Patterns, with its V neck sailor collar, would be the perfect backdrop to showcase my decorative stitches. Recently, I ordered a couple of wing needles on a whim. I had beautiful lightweight, pale blue-gray linen in my stash that would be perfect for hem stitching using my Bernina. Starting with a vintage-inspired pattern, I wanted a more modern looking garment.
Design
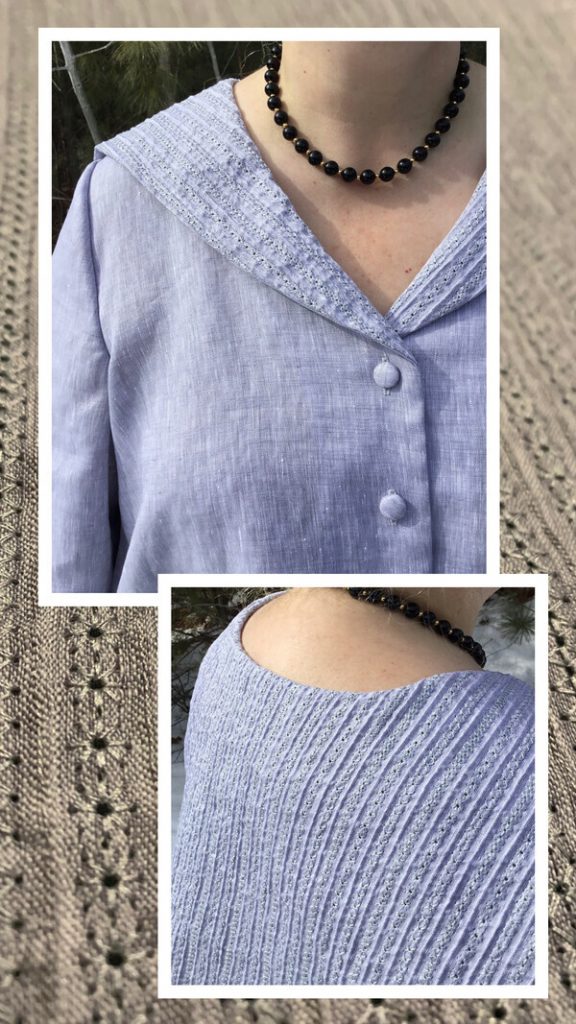
To make my collar stand out, I decided to make my own textile. Hemstitching would be the primary element. I experimented with so many stitches and stabilizers and threads. As I experimented, I would write in sharpie the stitch number, the stitch length, and stitch width. Using my samples, I would then cut and sew test seams. I found the hem stitches to be robust as they are formed by overstitching which makes it resistant to unravelling. After much experimenting, I settled on just three stitches on my Bernina 790 Plus:
701 with 7.0 length and 7.0 width
711 with 7.0 length and 7.9 width
308 with 7.0 length and 6.8 width
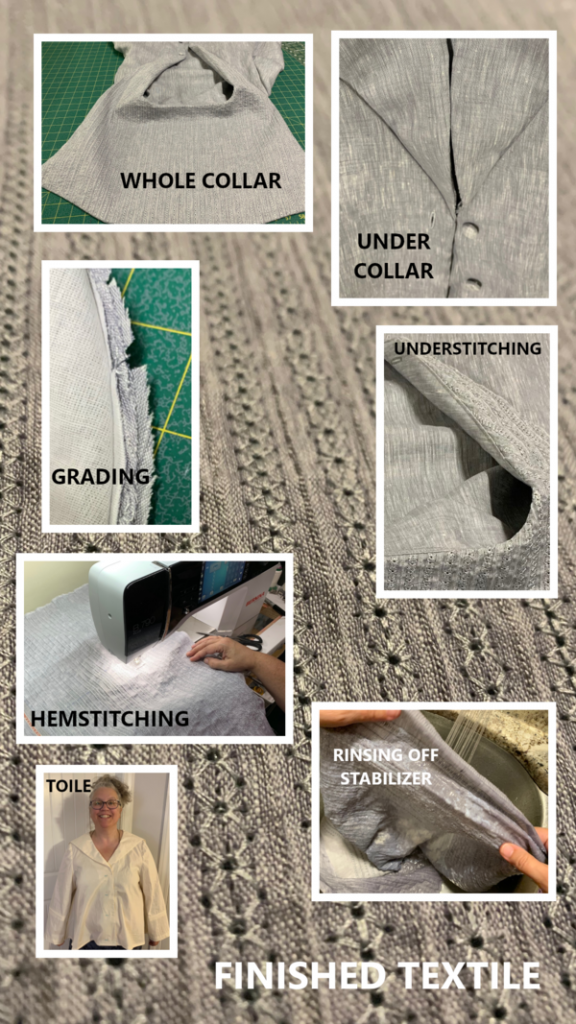
I decided to add pintucks. Using my Bernina 46C foot, a 2.0 twin needle, Isacord embroidery weight thread, bottomline thread in bobbin, and straight stitch 1 with 1.25 length, I added pin tucks, ½ inch apart. After prewashing and drying my fabric, I pressed it, but did not starch it. I cut a larger-than-needed piece for the collar, as the pintucks and decorative stitches would reduce the fabric width and length. I added 8 inches to the width and 3 inches to the length of my starting piece of linen. The extra allowed me flexibility when positioning the collar prior to cutting. I serged the edges to prevent raveling. I started the pintucks in the middle, working outward and always sewing in the same direction. My starting piece of linen for the collar was 36 inches wide by 30 inches long. I ended up sewing 60+ pintucks. I slowed my machine down and took my time, following the grainline of the fabric.
After pintucking, I pressed my cloth using a wool pressing pad to avoid crushing my tiny pintucks. Next, I stabilized the pintucked fabric with OSED’s Aqua Mesh Plus stabilizer. Using the Bernina 46C foot, a size 16 wing needle, and embroidery thread which matched the fabric, I hem stitched the designs between the pintucks. Matching thread color made the embroidery more contemporary. The grooves in the bottom of the 46C foot follow the pintucks allowing easy centering of decorative stitches. The hem stitches are formed by the wide wing needle, which pushes through the fabric forming little holes which add interest to the surface. Always sewing in the same direction, I would alternate between the three different stitches to add more visual variation. My sewing samples were washed and dried to ensure that my work would survive the rigors of typical laundering. I tried many stabilizers and one fusible interfacing, and the Aqua Mesh Plus gave me the best results for the lightweight linen I had chosen. It is applied with pressure, and should be rinsed out before laundering. All traces disappear leaving a wonderful one of a kind textile, with a good amount of drape. Once all stitching was done, the entire piece was tossed into washer and dryer. My collar was originally to be cut on the fold, but I cut it unfolded. I placed the pattern piece on the one side of the finished textile, with the fold line in the center of the fabric. I marked where the pintucks fell on the pattern piece, and traced around the outside of the pattern piece. I then flipped the pattern piece and aligned to the pintucks, using the mark to cut the collar symmetrically. My collar piece was cut and ready for assembly. I repeated the entire process to add accents on the sleeves. Cut a generous piece of previously laundered and pressed fabric, serge the edges, pintuck, stabilize, hemstitch, rinse, launder again to remove the remaining stabilizer, and then cut a right and left sleeve. Phew, that was a long day of sewing.
Pattern
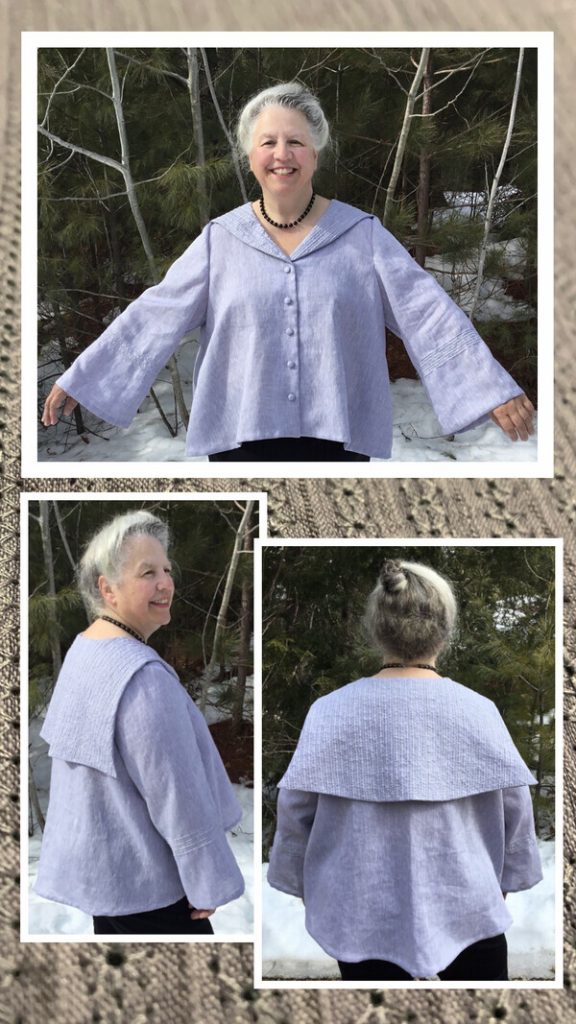
Never having made this pattern before, I started with a few pattern alterations that I commonly need. My chest measurement fell between XL and 2X. My hip measurements were outside the 3X size range but not by much, which was easily accommodated by the full swing design. I had to draft a 3X sleeve into the smaller XL/2X bodice. Every pattern piece was altered and I verified that the seams aligned throughout the modified pattern pieces. Using muslin, I cut and assembled my toile. The only additional modifications to the toile were shortening the sleeves by an additional 2 inches, and adding a bit of length to the front and front-facing pieces to honor the original design lines. I really fell in love with the garment at that point. I love how the collar frames the face, the curved hem, and the slightly bell-shaped sleeves. It was very comfortable and the embellished collar would be the main focal point of the garment. I did the simple button front, and used self-covered buttons to keep the focus on the collar. I did eliminate the center seam in the back and cut on the fold instead. It kept the back light and flowing, but it eliminated a convenient place to tack the back neck facing. In the end, if your fabric is wide enough, I would recommend eliminating the back center seam. Also, I found the sleeves unusually long.
Construction
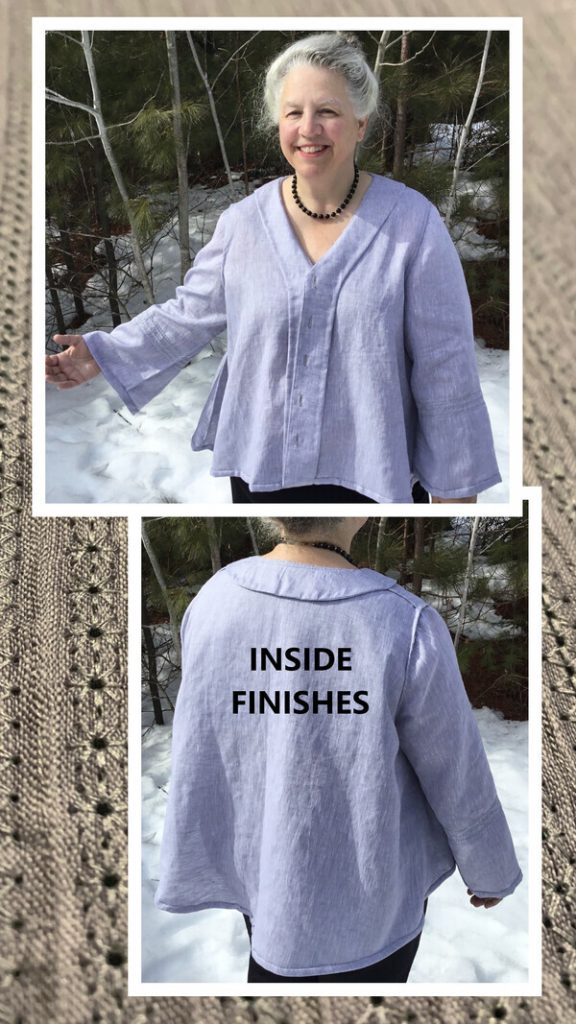
The pattern instructions are well written. I followed them pretty closely. I marked my notches and it gave me a straightforward assembly. The facing construction is not typical. You sew the facing pieces, sew the interfacing pieces, then sew them together, turn, and then press to fuse the interfacing. It gives a less bulky facing with a clean finish. I opted to use French seams throughout the garment. The armscye is finished by hand. The hems are done as instructed, but they were hand-stitched to keep a very clean finish. The most challenging part is setting the sleeves. To prepare setting the sleeves, I gather between notches using my favorite method. Starting with long thread tails, I increase the stitch length to 4.5 and disengage the dual feed. I hold my finger behind the presser foot as I slowly stitch; the fabric collects behind the foot while the fabric is gathered. If I need more gathers I can pull on threads. The longer the stitch, the more gathered the results. I learned this method from Deb Canham.
The collar construction is straightforward. The two collar pieces are sewn right sides together, seam allowances are trimmed, the collar is turned right side out, and pressed. The collar is then basted along the neckline to the garment, clipping, matching notches, and easing around curves. The facing is then placed on top of collar, and sewn, sandwiching the collar between the facing and the garment. At this point, grading the seam allowances is critical to reduce bulk and allow the collar to lie flat. Starting with seam allowance layer that will lie closest to the outer fabric, slightly trim the seam allowance. With each layer of the seam allowance trim a bit deeper to form a stepped effect. Press the graded seam allowance away from the garment, and under stitch to the facing as far as you can along the seam. This will prevent the facing from rolling over and showing. Finally, on this garment there is top stitching along back of neck between the shoulders, which holds the back collar in place but is hidden under the collar.
Materials
• 4 yds Lightweight linen purchased about a year ago, 3.25 for garment.
• 2.0 Twin needle for pintucking
• Bernina Foot 46C – great for pintucking, and decorative stitches between the pintucks
• Size 16 wing needle – for hem stitches featuring tiny holes
• Isacord Polyester Embroidery Thread – close match to fabric
• OESD Aqua Mesh Plus – used to back the hem stitches
• Frixion Pens for Marking
• Five 5/8 inch self-covered buttons
• Lightweight Fusible Interfacing
Conclusion
I absolutely adore this blouse. Like the blouse, it makes me feel light, pretty, and feminine while wearing it. It is extremely comfortable. The key is to get the fit on the shoulders, neckline, arms, and bust perfect. This garment is versatile as it could be worn as is, or even used as a jacket for layering. The subtle bell-shaped sleeves, the curved hem lines, and the showpiece collar (made from a textile designed and created by myself) all come together to make it a truly unique garment.
Thanks again to Pattern Review, the judges, the mentors, the sponsors, and my fellow contestants who together make the sewing bee one of the highlights of my year.