
The challenge was to make Jalie’s 3906 Tania Coatigan. The pattern is an unlined boxy mix between a coat and a cardigan. On my sewing to do list was a summer weight linen jacket to wear to an outdoor graduation ceremony coming up in a few weeks. My daughter is being presented with her PhD of English from Harvard University, which she completed last year during the pandemic. This would be a pinnacle moment and my outfit needed to rise to the occasion.
Although many Jalie patterns do extend beyond my measurements, the size chart on the Tania stopped below my waist and hip measurements. My measurements are 46.5” bust, C cup, 49” waist, and 59” hips. No stranger to altering patterns to accommodate my figure, I compared my measurements to the body measurements chart. My first toile was size DD bust, grading out to GG (largest size) at the waist plus a total of 5 inches (or 1.25” per side) to the waist and hips. I choose the size GG sleeves, as my biceps are quite large at 19 inches. As a layering piece, the jacket would need generous sleeves. I drew the GG armscye on my pattern starting at the DD shoulder point, being sure to maintain the grainlines. This both extended the armscye to the side and lowered it down the side. The extensions were within ½” of each other, which I felt I could handle when easing the sleeve onto the armscye, so I made no further adjustments to the sleeve or armscye. My combination of large upper arms and a relatively small chest is sometimes a challenge when modifying patterns to fit me, but the alterations worked out smoothly for this pattern. With the pattern traced and altered, I was ready to make a muslin.
My first toile was made out of muslin and it really caught my eye. I always leave the side seams partially open for my first fitting. I loved the unique neckline. The shoulders and sleeves worked perfectly. I loved that I could push up the sleeves and they stayed up reminiscent of the style I loved in the 80’s. The front fell straight and remained neatly gapped, yet wide enough to meet in the center front. The overall make was straight forward. But, turning to the side the muslin revealed significant shortages from the waist to the hips. At this point, I choose not to add to just the waist and hips, but instead added to the front and back side pieces, 2 inches at the arm pit, tapering to 4 inches where the hip meets the hem. The seam allowance between upper and lower pieces were removed, before making the alteration to the sides, and then re-added after the width of the garment had been adjusted. This is important. Also, truing up the side seams to make sure the lengths are the same is another important step. This approach would maintain a more boxy shape, and avoid the look of a swing coat. The results were a jacket that fit well on the shoulders, chest, and arms, and then continued through waist and hips with a relaxed slightly oversized appearance that skimmed over my figure in all the right places.
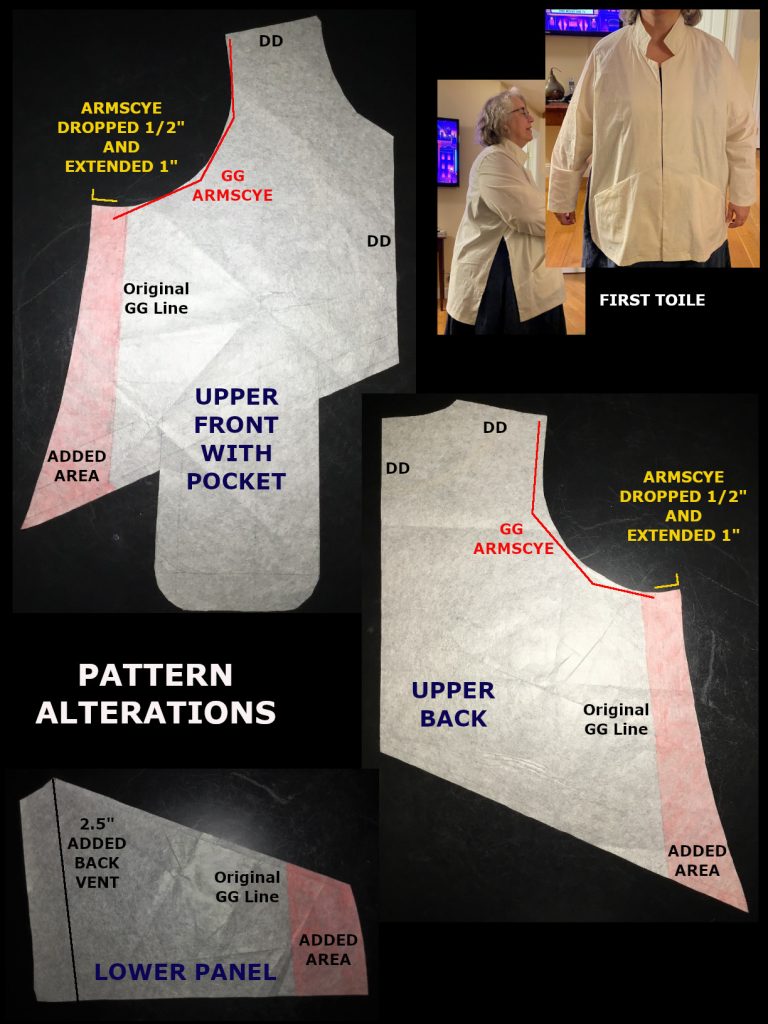
Unlike the last challenge which involved a lot of new technology and tools, I went old school on this challenge, relying heavily upon pencil and paper. After re-drawing the upper and lower front and upper and lower back pattern pieces with the additional inches, I made a further enhancement to the pattern, by adding a back vent or slit, to the lower back panels. A back vent would make the jacket more flattering and comfortable when seated. I also decided to line the jacket to add some polish. I compared the lining pattern pieces which I purchased separately to the original pattern pieces to understand how I should draft the lining pieces for my heavily modified version. The complexity of lining a back vent proved to be difficult. Thank goodness for the YouTube video describing how to draft and sew a skirt back vent with lining by “Sew Imani”.
For my second toile, I chose a lightweight printed denim for the main fabric, and selected a printed rayon for the lining, both from my stash. The assembly went smoothly. Intending this as a second toile, this garment came out beautifully. The fit was exactly as I wanted it. I would have been done except that this jacket was too casual and much too warm for the upcoming graduation.
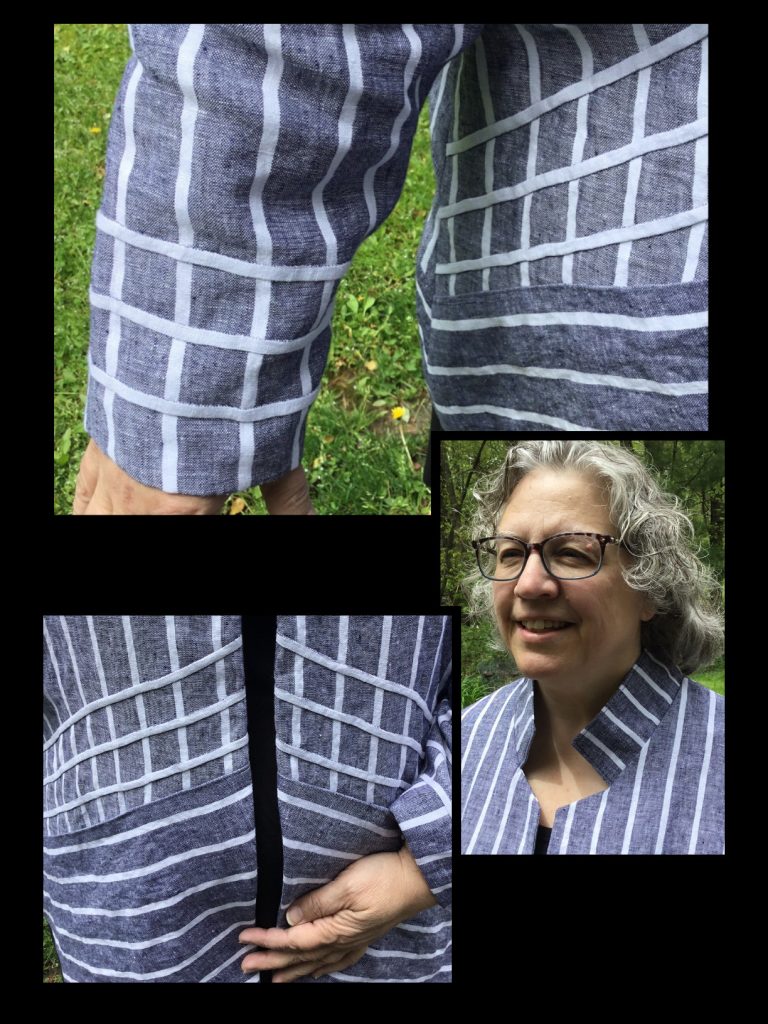
For my summer version, I chose to use a linen. I was also going to lose the lining, and replace it with a cotton voile underlining which would add some structure to the linen while maintaining the breathability. I had stumbled across a striped Ralph Lauren jacket which was my inspirational starting point. I found a navy and white striped linen in my stash, but there was only 3 yards and 6 inches. I had purchased this as an end of bolt remnant at a local fabric shop, several years ago. I also had some tissue thin white cotton voile in my stash. For added visual interest, I planned to cut the lower front and back panels at opposing angles. I would appliqué some perpendicular stripes on the lower sleeves. To change the visual proportion of the garment to better suit my figure, I would add angled intersecting appliquéd stripes along the lower part of the upper front panels. At that point I felt the garment would really pop.
Having just barely enough fabric, meant taking extra precautions when laying out the pattern pieces. To align the stripes, cutting each piece one at a time was necessary. Care had to be taken to mirror pieces to maintain the right side of the fabric and the desired direction of the stripes. A shockingly small pile of scraps was all that remained after cutting all the pattern pieces. There was another deviation from the pattern that I made at this point. I applied a piece of crisp shirt tailoring interfacing along the fold line on the top of the pocket on the lower front panels. This added stiffness and would discourage stretch along the top of the pocket, without altering the appearance. With the cutting of the main fabric pieces complete, it was time to underline.
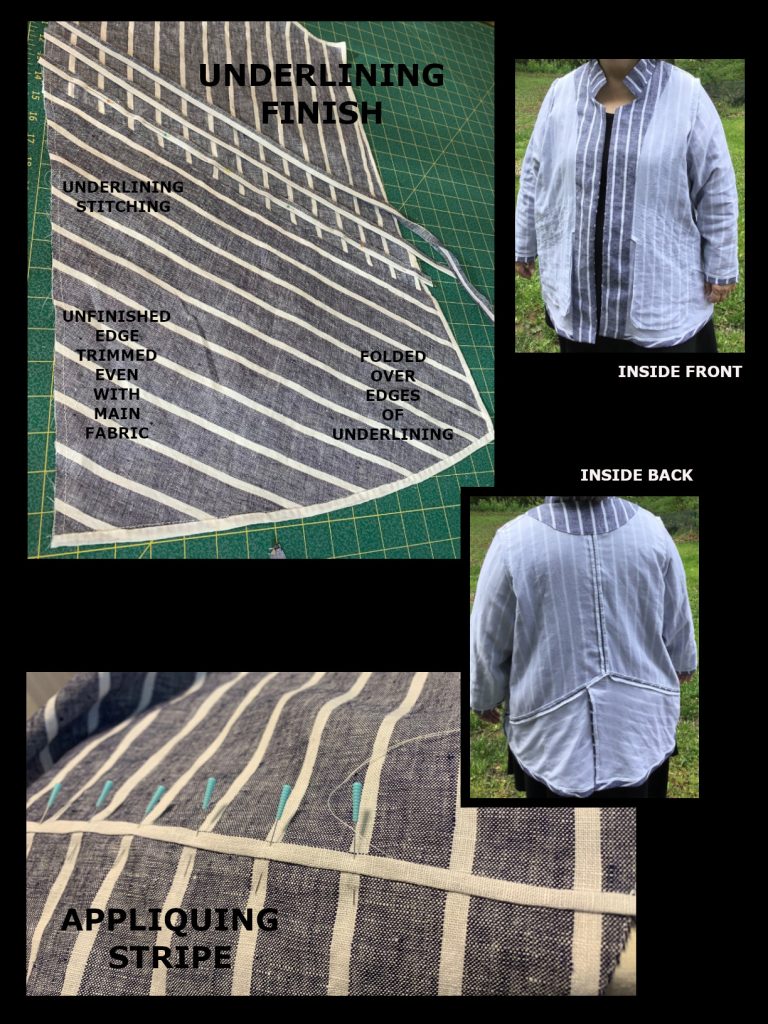
With linings, you typically assemble the outer garment and the inner lining separately and join together. With underlining, each fabric piece is attached to a piece of lining material, before the garment is assembled. Some additional benefits of underlining versus lining are it can alter drape, and may reduce wrinkles, garment wrinkles that is….
Underlining would require finishing each pattern piece prior to assembly. All pieces except the facings and the collar would have to be underlined. All edges which you were instructed to finish in step 4 of the pattern would have the underlining extended over to the right side and clean finished. The sleeves and upper front panels were to have additional stripes appliquéd on. I underlined first, and then appliquéd. This being my first time underlining a garment, my technique evolved over the project. It is critical that the underlining not restrict or ripple under the main fabric. The grain line of underlining followed grain lines marked on the original pattern. The cotton voile was incredibly sheer, making it a bit of a challenge to work. Lightly starching both the main fabric and the underlining help to achieve a more precise layering of the pieces. I heavily pinned, then machine basted with a long stitch a quarter of an inch along all outside edges. This basting must fall within the seam allowance. To enclose raw edges where desired, I doubled folded the underlining over the edges and stitched them down. Again the width of the fold over must be less than the seam allowance. On the unfinished edges I trimmed the underlining even with the main fabric. This was a very time consuming process but the linen pieces felt more substantial afterwards, and the inside finishing was practically done.
Intending to pull out some of my lovely stashed white linen to make my additional stripes, I discovered that I had a lot of not quite white linen. In fact, I did not own any pure white fabric to match the white stripes in my linen. The only way to match the stripe was to fussy cut the stripes out of my shockingly small pile of scraps. Using a rotary cutter and an acrylic see thru ruler, I cut the strips leaving a 1/4 inch seam allowance on each side. I pinned the strip in place then machine stitched across one long edge of the white strip. I trimmed the seam allowance down to a generous 1/8th inch. I finger pressed along the other edge of the white strip, and then folded the strip over and pressed. Wanting to minimize topstitching on the jacket, I used the needle turn appliqué method to stitch the second edge of the stripe down by hand. There were twelve stripes total, three on each sleeve and three on each upper front panel. This brought back fond memories of my hand applique quilting from years ago.
At this point, the pieces were ready for assembly. I followed the patterns instructions. Extra care had to be taken to maintain spacing, and stripe alignment. Another advantage to underlining a garment is that all the hems and facings can be tacked just to the underlining leaving a smooth finish on the outside of the garment. Just a good press, and I was ready for my close ups.
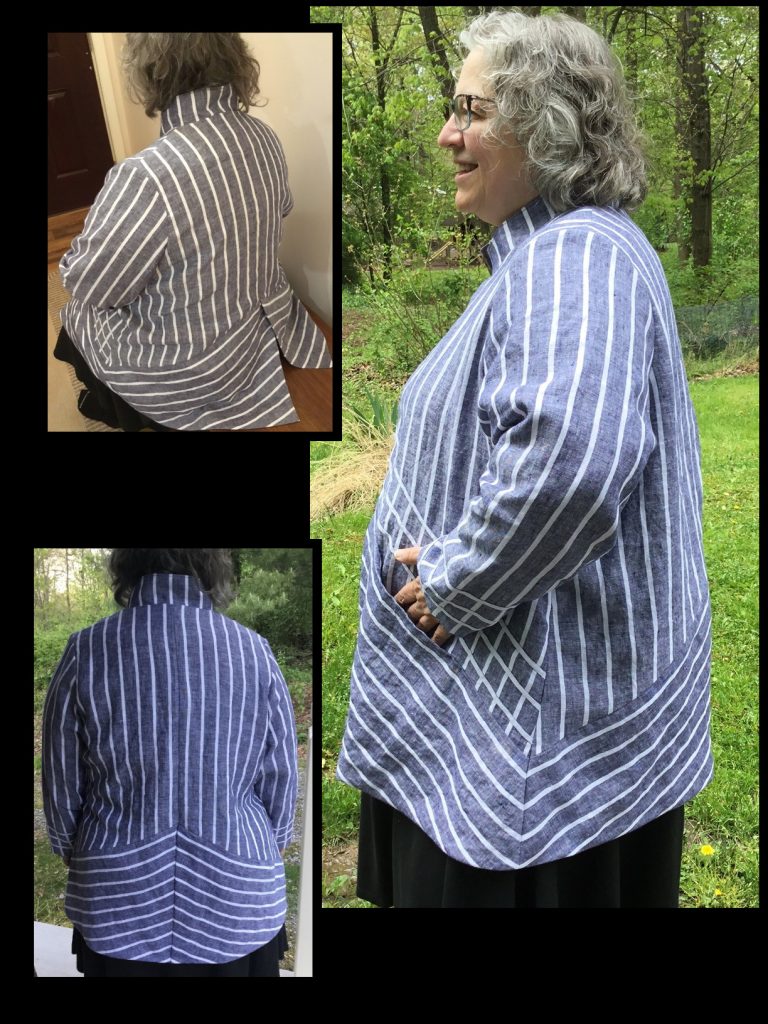
For this challenge, I altered the pattern to accommodate my size. There is a story of a mechanic that charged thousands of dollars after making a repair with a single tap of a hammer. The value was in knowing where to strike. When altering patterns, the value is in knowing where to make the changes as well as the order and the amount of adjustments to make. This comes with experience. Every time I modify and fit a pattern I learn something new, and I improve. This time was no exception. This time I learned it was important to know when to stop. I felt a strong temptation to over fit this jacket. It would have had a much more swing shape to it, much like my figure. But, this time, I was able to stop myself, and consider the overall desired look of the garment. I really wanted a more boxy silhouette, which I achieved.
I also tackled some new to me techniques during this challenge. I underlined a garment for the first time to get the desired drape while maintaining breathability. I added a back vent to the pattern, to add comfort and improve the look of the garment when seated. I cut the lower front and back panels at an angle to add visual interest. I added some additional stripes to enhance the visual proportions of the overall garment. I also inadvertently completed my first low waste make, with just a few ounces of linen scraps remaining. I am so proud and excited to present this garment as my entry to Round 3 of the Sewing Bee 2022 Challenge. As always, I am grateful to Pattern Review, the contest committee, the moderator, the judges, the sponsors, and my fellow contestants, who together make the Sewing Bee the one of a kind inspirational experience that it is.