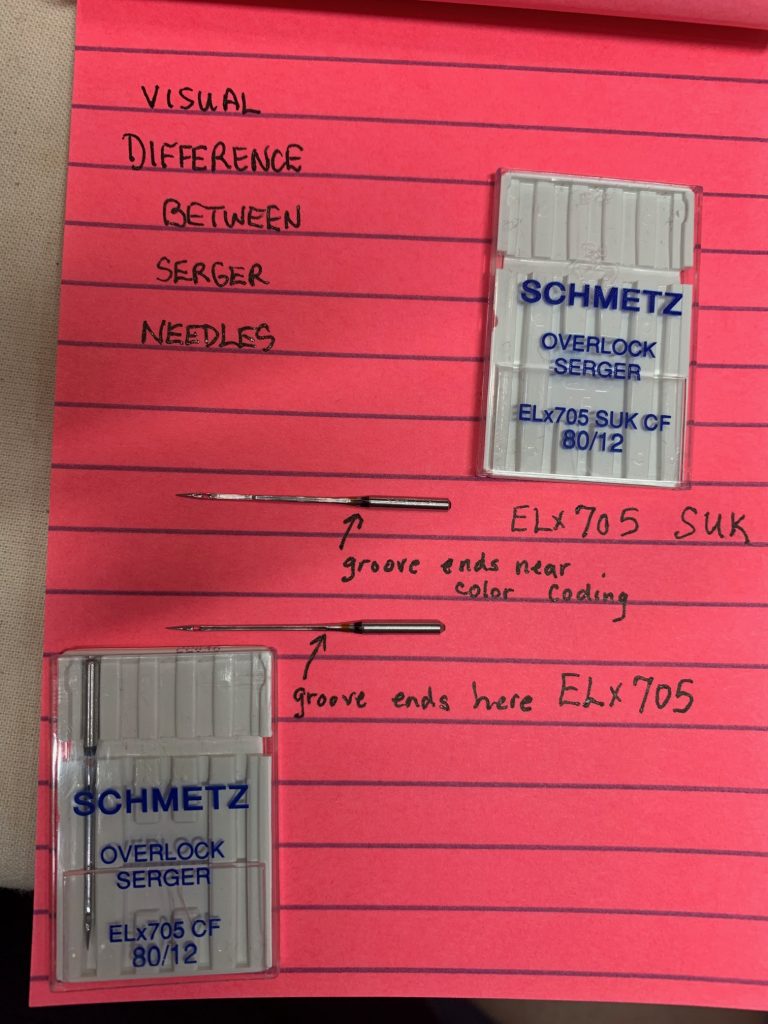
I recently bought a new serger/coverstitch combination machine. My cover stitches were not consistent. I discovered my new machine called for and worked much better with ELx705 needles, which are not the same as 130/705 needles. I found ELx705 in sizes 80 and 90, with and without CF chrome finish, and with the option of a regular universal point or an SUK medium ball point. Schmetz’s color coding is so helpful but fails to distinguish an SUK serger needle from a regular universal point serger needle, so here is a tip to help you distinguish between them. The front groove extends farther up into the color coding on an SUK serger needle. The regular serger needle’s front groove ends below the color coding.
Needles are expensive but necessary and the right needle for the job is important. Typically SUK or ball point needles are recommended when sewing or serging knits. I could not verify this works for the Organ brand needles which offers both styles of serger needles but no color coding so I tend to go for Schmetz needles. Happy sewing.
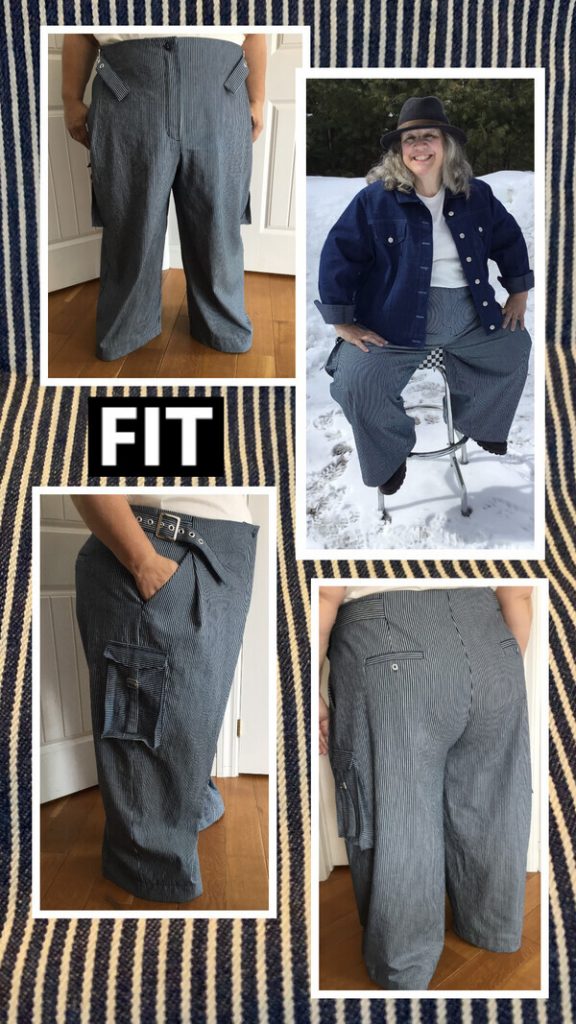
At the beginning of every Sewing Bee Round, I compare the challenge to my sewing to-do list. The challenge was cargo bottoms, and on top of my sewing to-do list was, make another pair of Mitchell Trousers by Closet Core Patterns. The Mitchell Trousers pattern released last fall, and I had my first pair made within weeks. I had fallen in love with the Pietra Pants and Shorts pattern also by Closet Core, and I was hoping to achieve the same great fit with the Mitchell Trousers, which I did and without elastic! To make the Mitchell Trousers more cargo I would add some cargo pockets, use a sturdier fabric, amp up the strap factor, make the wide leg version but with a way to cinch them, and replace the waist adjustable slides with belt buckles and some eyelets.
The Plan
My first pair of Mitchell Trousers was a straight size 28, with a slight extension to front and back crotch curves. I also removed 4 inches from the legs. They were a perfect fit in the back but the front was still a bit big. After examining the pattern I realized I could use a smaller size 26 front, with the larger size 28 back, and all notches would still match along the side seams. Replacing the adjustable slides in the waist band with belt buckles would allow a more robust fit, but would result in the straps falling forward. I decided to lean into the strap factor. The strap would also need eyelets. I had never made a belt before. My first pair of Mitchell Trousers was the tapered version, but the wide leg version would more easily accommodate the addition of cargo pockets which would straddle the side seam and close with a strap and adjustable slide. Not having worn wide leg pants since high school, this choice was a bit outside my comfort zone, so a way to cinch the wide leg pants would be added. The pattern also comes with great slash pockets and two welt pockets in the back. The bottom of the pant leg would have a drawstring with cord locks to cinch the leg. To amp up the strap factor, I made ankle or leg belts which wind around my leg twice and then are cinched with another 1 inch adjustable slide, making a nice puffed cuff look when I want to tame the wide leg and add a bit of wow.
Pattern and Supplies
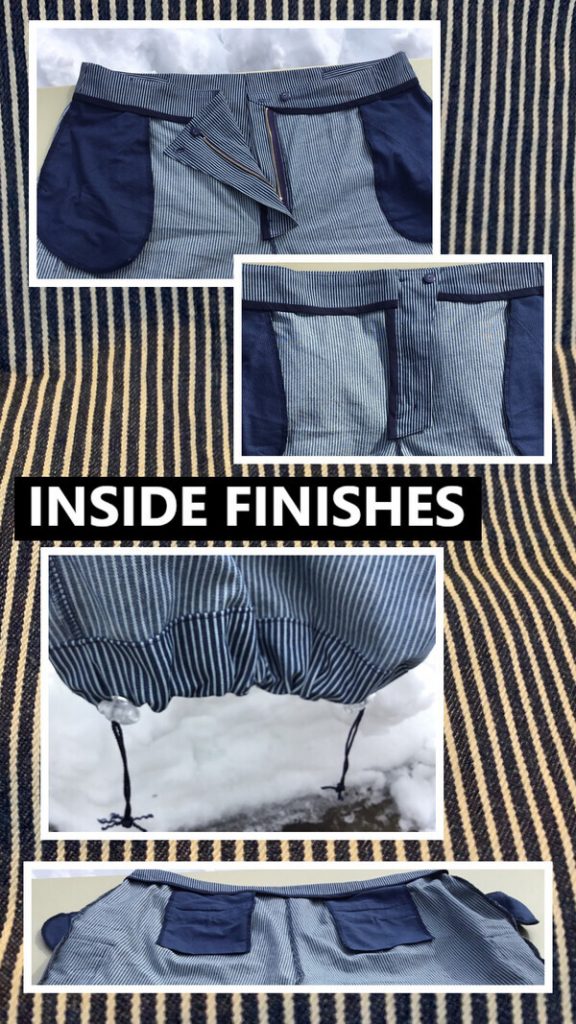
The Mitchell Trousers pattern is an intermediate sewing pattern. Markings are critical to a successful assembly. I followed instructions closely, and highly recommend this pattern for its excellent design, drafting and instructions. There are optional welt pockets, which I love! The front features a pleat that falls just in front of a slash pocket. The pleats along with the waistband design allow the pants to fall so nicely when standing, yet expand when sitting to make them comfortable in both positions. The material I chose is a deep stash, striped medium weight denim. The stripes add verticality to the garment. The sewing and assembly is a bit more challenging in the heavier weight fabric. It is 54” wide and I used just under 4 yards. I used about half a yard of sturdy cotton for lining. Due to the stripes, I cut each pattern piece separately to honor the grainline and opted to minimize the topstitching. The following hardware was used:
Two 1.5 Belt Buckles Eighteen .25 Eyelets for belting and cinching Four 1 inch adjustable slide buckles for pockets and ankle straps Cording for cinching 4 cord locks for cinching Interfacing for waistband 7 inch jeans zipper (pattern calls for 8 inch but 7 inch worked fine) 2 large buttons for front closure 2 small buttons for welt pockets 2 Rivets for belt
Modifications
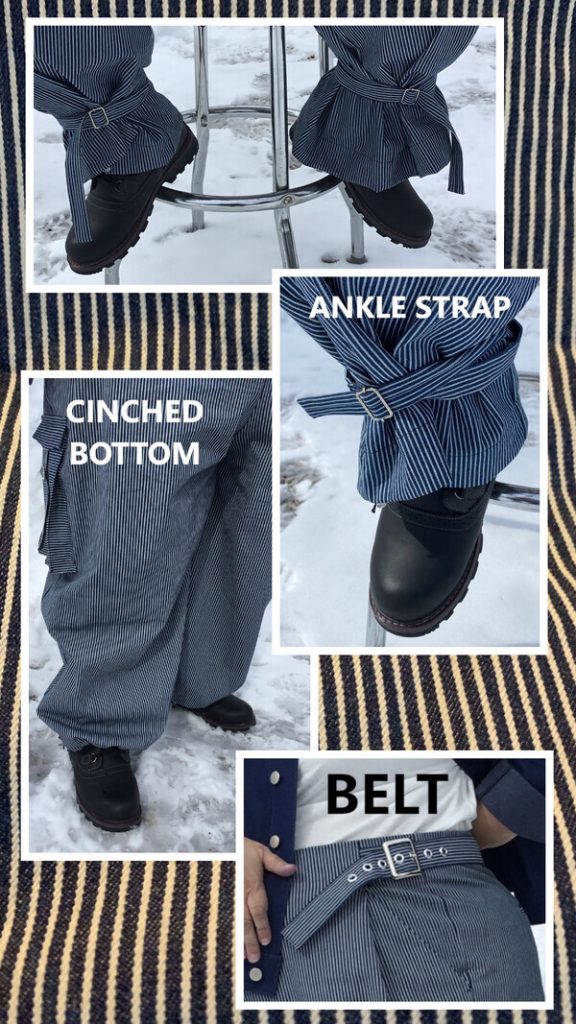
Installing belt buckles is somewhat more involved than installing adjustable slides. Start with a slightly longer strap than the pattern piece Q. Assemble the strap as instructed through edge stitching. It will be cut down to the correct size after the belt buckle is attached. Before installing the buckle, an eyelet is installed in the center of the strap. The prong of the belt is inserted into the eyelet, and both straps are folded in half inside of the buckle. It is important to secure the straps together close to the bar. The distance between the bar and the point of the attachment must be shorter than the prong, to avoid the prong slipping out of the eyelet. This can be tricky to sew on a sewing machine. I opted to install a rivet instead. Trim the belt buckle strap to the patterns original size (piece Q folded in half). Make sure the buckle is right side up, and the prong is pointing toward the side seams before sewing it in place. After the pants are assembled you must mark the point where the prong and the front of the buckle meet on the back waist band straps. This is the point of the first eyelet. I used 1/4 inch eyelets, placed one inch apart. I added several before and after my original mark to allow for adjustments and for accents. The waist adjustments really help make these pants incredibly comfortable. The adjustable buckle slides or D rings are called for in the pattern, but belting gives it a more robust feel and look which the denim can support.
I prefer that ankle straps wrap around twice, with a bit to dangle. For my ankle straps, I measured the length to wrap around my leg or ankle, then doubled and added several inches. This is the length of the strap. I cut a 2.75” wide strip to my calculated length. I stitched a 3/8th inch seam, and pressed the seam open and centered. I stitched one end closed, and turned the strap. I edge stitched around, and then sewed on a 1 inch adjustable slide buckle as per the instructions.
For the bottom of the leg cinch, I installed two ¼ inch eyelets near the side seams and lower edge of the inside hem of pants. I fished the cord between the two eyelets, made a loop long enough for knotting, installed a cord lock, and then fished the cord back to first eyelet. I then installed a second cord lock. I made the cord locks just long enough to allow the hem to be its full width, and then knotted and trimmed the cording. Using cord locks on both side of the pant leg reduces the length that the drawstring hangs when cinched.
Cargo Pockets
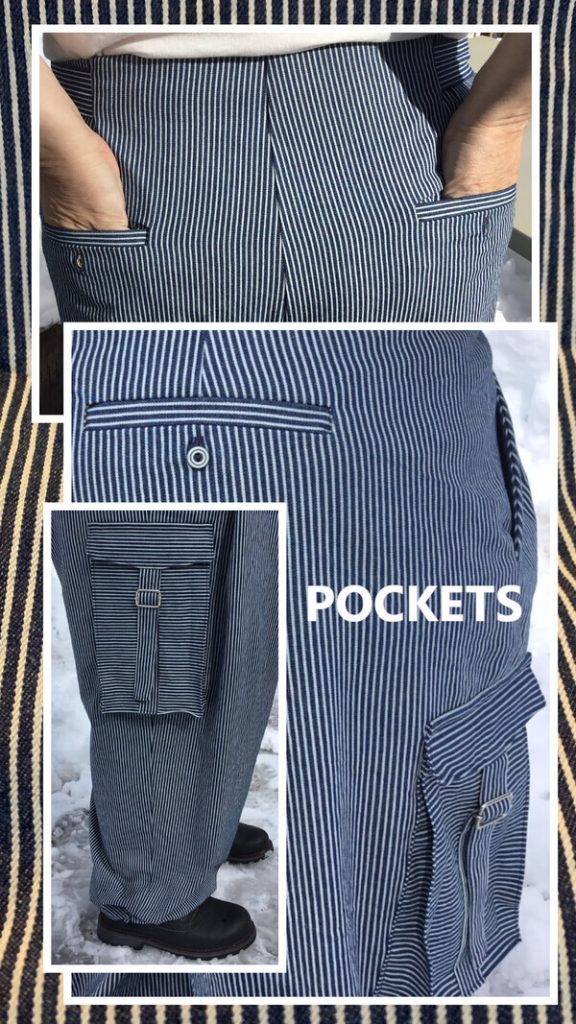
The pockets were inspired by the You Tube, “How to sew box pocket | Cargo pocket | Box pocket with loop” by Taylor 4u. This video has no instructions or voice over. After watching it a half a dozen times, I drafted my pattern cutting the main pocket piece 10 by 12.5 inches. Mark a top and bottom. I finished the sides and bottom with a serger. For the top, fold over ¾ inch press, then fold over again, and stitch down. Mark (removable) a centered 1 by 8.5 inch rectangle starting at the bottom of the pocket piece. Cut a 1.75 by 10 inch strip. Press 3/8 inch over both long sides of the strip, then starting at bottom of pocket, align it against the marked rectangle and stitch up 6.5 inches. At this point install the adjustable slide buckle, and finish stitching the strip down using the marks as guides. The top of the adjustable slide buckle should fall 2.5 inches below the finished top of pocket. Press 2 inch down on the 3 unfinished edges. Cut 1.75 inch square out of each of the lower corners. Fold right sides together and stitch (or serge) the bottom seams. Fold wrong sides together along the 2 inch pressed edges and stitch a 1/8 inch edging. Make a template of this finished front, and use this to mark the placement on the garment. My pocket finished at 5.75 by 8.75 inches. I pressed the edges over 3/8th of an inch and then pinned, basted, and then stitched the pocket in place on the garment. I stitched the top of pocket down for ¾ inch on both sides. Make two 7.5 by 1 inch long straps just like the ankle strap.
The flap starts by cutting a 2.75 by 6.75 rectangle and trimming the corners to accommodate the 1 inch strap. Baste the strap onto the piece with right sides together. I placed this on larger scrap, with stripes aligned and stitch a 3/8 inch seam around the sides and bottom of flap. I graded and turned the flap, and edge stitched the flap. The flap is sewn down to the garment with a ¼ inch seam, ½ inch above the pocket, with right sides together and facing up away from pocket. Press the flap down into place and stitch 3/8 in from folded edge, being sure to enclose raw edges of the top of the flap. Backstitch to reinforce. I choose to place my cargo pockets centered along the side seams of pants, and ending just above where my knee bends.
Conclusion
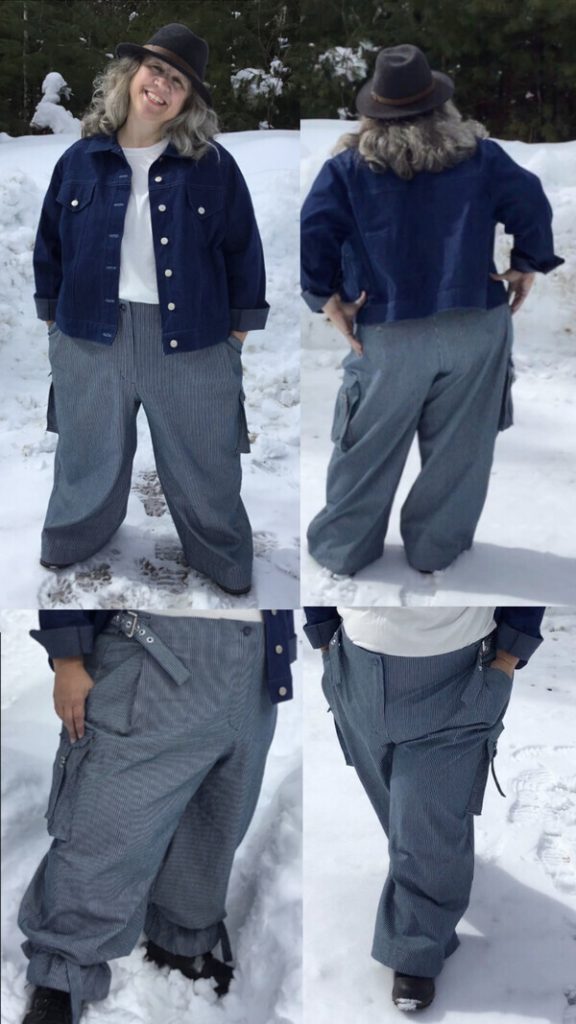
I love my wide leg cargo pants. The proof is that after the taking the photos, I wore them the rest of the day. I prefer them cinched at bottom for around the house. I like the ankle straps when stepping out. I love the comfort of the wide leg. These may replace my joggers as my go to comfort pants.
My outfit for the photos are: the jean jacket is a Seamwork’s Audrey that I made years ago, a brand new white organic tee shirt (so incredibly comfy), Wool hat purchased in Innsbruck, Austria, and my snow boots because it has not stopped snowing for the last 10 days or so. The incredibly beautiful sunshine is courtesy of Mother Nature, so grateful!
And as always I want to express my appreciation to the Pattern Review community, the judges, the sponsors, the contest manager, mudcat, and most of all to my fellow contestants.
Pattern Description:
Wonderful woven trouser pattern featuring adjustable waistband, slash pockets, front pleat, optional welt pockets with both tapered and wide leg options.
Pattern Sizing:
They offer two size bands 0 to 20 and 14 to 32, which accommodates 53 inch waist and 63 inch hips.
Did it look like the photo/drawing on the pattern envelope once you were done sewing with it?
Absolutely!
Were the instructions easy to follow?
Yes and No. The instructions were excellent but this is an intermediate pattern and it does assume a fair amount of experience. To confess, I took an online class/sew along offered by Pintuck and Purl in New Hampshire and taught by Sarah Joiner. Really enjoy her classes. This reduced my stress factor but I think I could have managed it on my own.
What did you particularly like or dislike about the pattern?
Love the pleat that falls just next to slash pocket. Love the shaping of the back. I just got an amazing fit. It is clever design.
Fabric Used:
Striped medium weight Denim bought years ago.
Pattern alterations or any design changes you made:
Yes, a few see details in my sewing bee write up.
Would you sew it again? Would you recommend it to others?
Yes, and Yes. I have a black satin cotton twill that I am making it in next. I might try to do a leg somewhere in between the taper and wide leg.
Conclusion:
If you love the Pietra pattern, you should definitely give the Mitchell Trousers a go!
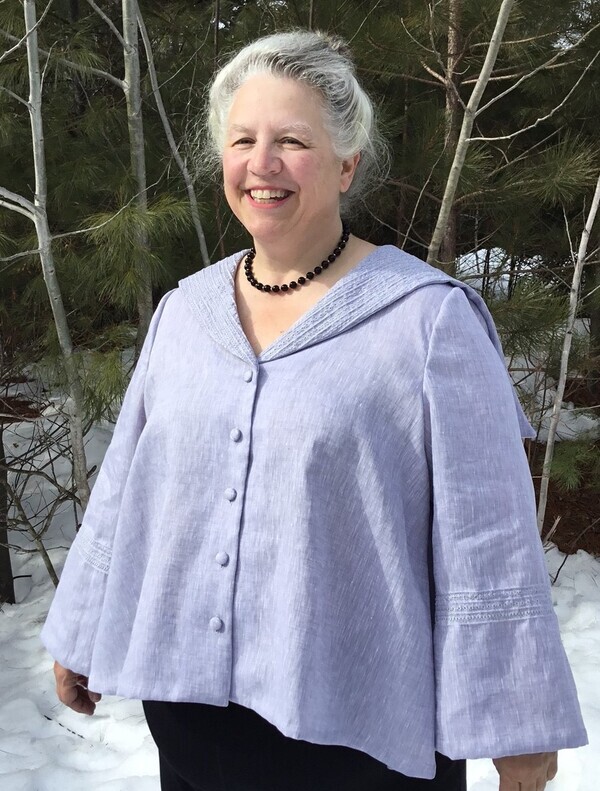
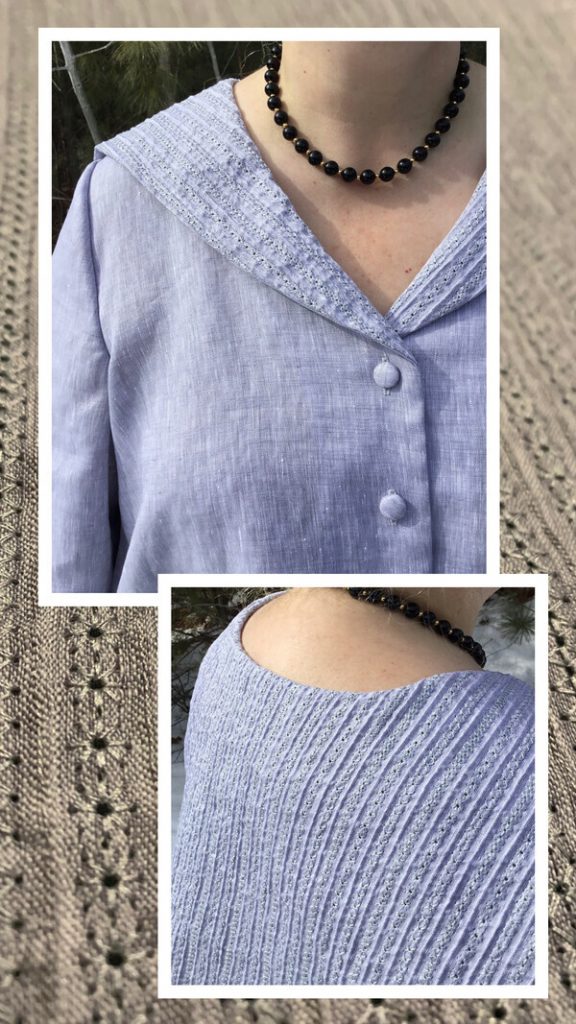
As a short-necked person, I mostly avoid them. Continuing in my exploration of new embellishment techniques, I wanted a flat collar with plenty of room to show off some pretty stitches. The Metro Middy blouse pattern from Folkwear Patterns, with its V neck sailor collar, would be the perfect backdrop to showcase my decorative stitches. Recently, I ordered a couple of wing needles on a whim. I had beautiful lightweight, pale blue-gray linen in my stash that would be perfect for hem stitching using my Bernina. Starting with a vintage-inspired pattern, I wanted a more modern looking garment.
Design
To make my collar stand out, I decided to make my own textile. Hemstitching would be the primary element. I experimented with so many stitches and stabilizers and threads. As I experimented, I would write in sharpie the stitch number, the stitch length, and stitch width. Using my samples, I would then cut and sew test seams. I found the hem stitches to be robust as they are formed by overstitching which makes it resistant to unravelling. After much experimenting, I settled on just three stitches on my Bernina 790 Plus:
701 with 7.0 length and 7.0 width 711 with 7.0 length and 7.9 width 308 with 7.0 length and 6.8 width
I decided to add pintucks. Using my Bernina 46C foot, a 2.0 twin needle, Isacord embroidery weight thread, bottomline thread in bobbin, and straight stitch 1 with 1.25 length, I added pin tucks, ½ inch apart. After prewashing and drying my fabric, I pressed it, but did not starch it. I cut a larger-than-needed piece for the collar, as the pintucks and decorative stitches would reduce the fabric width and length. I added 8 inches to the width and 3 inches to the length of my starting piece of linen. The extra allowed me flexibility when positioning the collar prior to cutting. I serged the edges to prevent raveling. I started the pintucks in the middle, working outward and always sewing in the same direction. My starting piece of linen for the collar was 36 inches wide by 30 inches long. I ended up sewing 60+ pintucks. I slowed my machine down and took my time, following the grainline of the fabric.
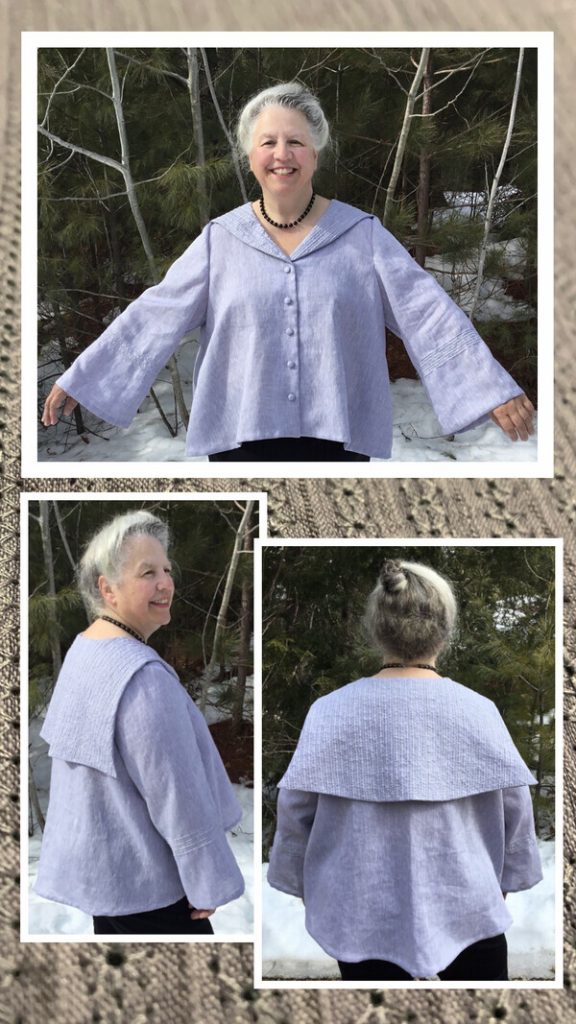
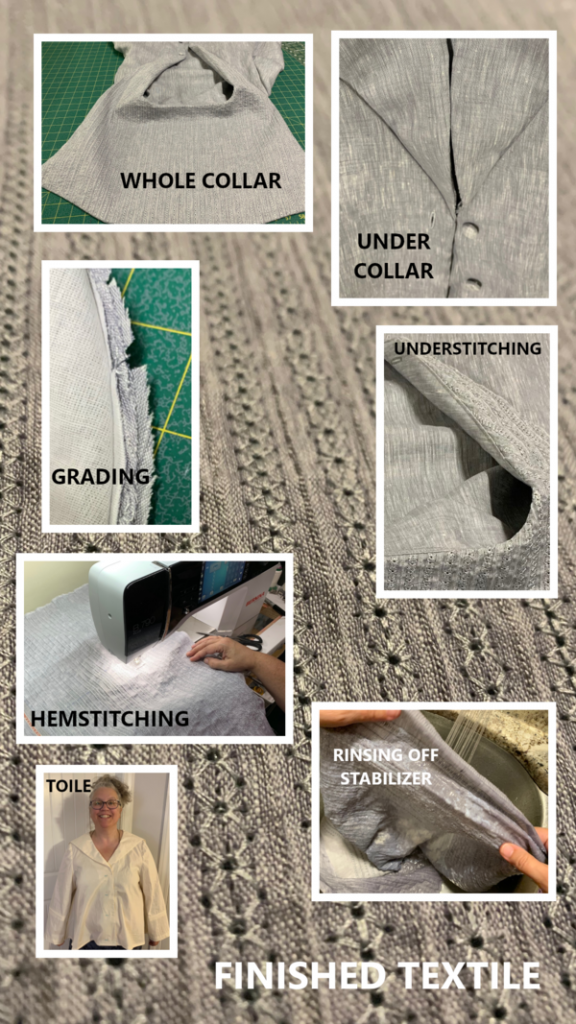
After pintucking, I pressed my cloth using a wool pressing pad to avoid crushing my tiny pintucks. Next, I stabilized the pintucked fabric with OSED’s Aqua Mesh Plus stabilizer. Using the Bernina 46C foot, a size 16 wing needle, and embroidery thread which matched the fabric, I hem stitched the designs between the pintucks. Matching thread color made the embroidery more contemporary. The grooves in the bottom of the 46C foot follow the pintucks allowing easy centering of decorative stitches. The hem stitches are formed by the wide wing needle, which pushes through the fabric forming little holes which add interest to the surface. Always sewing in the same direction, I would alternate between the three different stitches to add more visual variation. My sewing samples were washed and dried to ensure that my work would survive the rigors of typical laundering. I tried many stabilizers and one fusible interfacing, and the Aqua Mesh Plus gave me the best results for the lightweight linen I had chosen. It is applied with pressure, and should be rinsed out before laundering. All traces disappear leaving a wonderful one of a kind textile, with a good amount of drape. Once all stitching was done, the entire piece was tossed into washer and dryer. My collar was originally to be cut on the fold, but I cut it unfolded. I placed the pattern piece on the one side of the finished textile, with the fold line in the center of the fabric. I marked where the pintucks fell on the pattern piece, and traced around the outside of the pattern piece. I then flipped the pattern piece and aligned to the pintucks, using the mark to cut the collar symmetrically. My collar piece was cut and ready for assembly. I repeated the entire process to add accents on the sleeves. Cut a generous piece of previously laundered and pressed fabric, serge the edges, pintuck, stabilize, hemstitch, rinse, launder again to remove the remaining stabilizer, and then cut a right and left sleeve. Phew, that was a long day of sewing.
Pattern
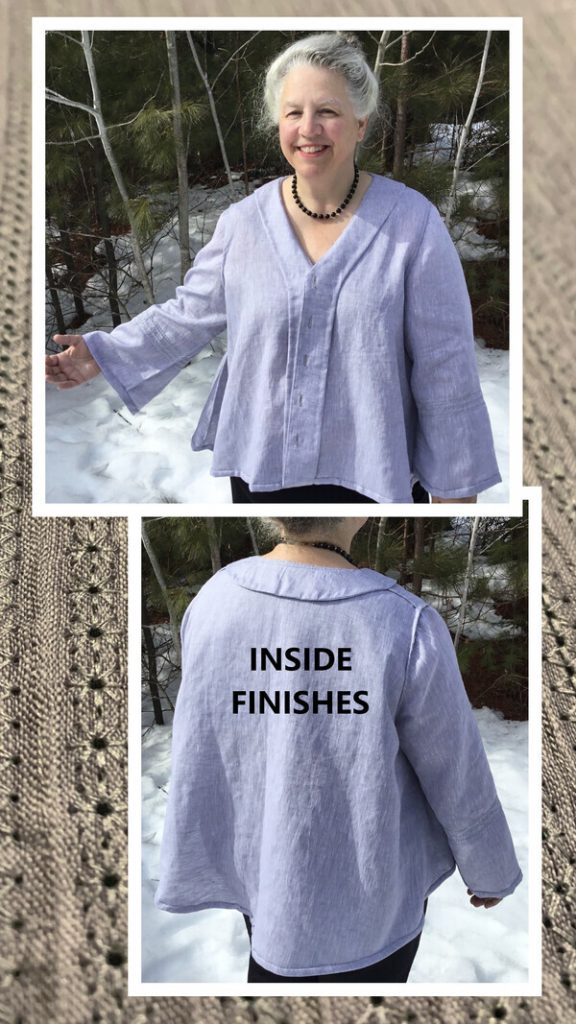
Never having made this pattern before, I started with a few pattern alterations that I commonly need. My chest measurement fell between XL and 2X. My hip measurements were outside the 3X size range but not by much, which was easily accommodated by the full swing design. I had to draft a 3X sleeve into the smaller XL/2X bodice. Every pattern piece was altered and I verified that the seams aligned throughout the modified pattern pieces. Using muslin, I cut and assembled my toile. The only additional modifications to the toile were shortening the sleeves by an additional 2 inches, and adding a bit of length to the front and front-facing pieces to honor the original design lines. I really fell in love with the garment at that point. I love how the collar frames the face, the curved hem, and the slightly bell-shaped sleeves. It was very comfortable and the embellished collar would be the main focal point of the garment. I did the simple button front, and used self-covered buttons to keep the focus on the collar. I did eliminate the center seam in the back and cut on the fold instead. It kept the back light and flowing, but it eliminated a convenient place to tack the back neck facing. In the end, if your fabric is wide enough, I would recommend eliminating the back center seam. Also, I found the sleeves unusually long.
Construction
The pattern instructions are well written. I followed them pretty closely. I marked my notches and it gave me a straightforward assembly. The facing construction is not typical. You sew the facing pieces, sew the interfacing pieces, then sew them together, turn, and then press to fuse the interfacing. It gives a less bulky facing with a clean finish. I opted to use French seams throughout the garment. The armscye is finished by hand. The hems are done as instructed, but they were hand-stitched to keep a very clean finish. The most challenging part is setting the sleeves. To prepare setting the sleeves, I gather between notches using my favorite method. Starting with long thread tails, I increase the stitch length to 4.5 and disengage the dual feed. I hold my finger behind the presser foot as I slowly stitch; the fabric collects behind the foot while the fabric is gathered. If I need more gathers I can pull on threads. The longer the stitch, the more gathered the results. I learned this method from Deb Canham.
The collar construction is straightforward. The two collar pieces are sewn right sides together, seam allowances are trimmed, the collar is turned right side out, and pressed. The collar is then basted along the neckline to the garment, clipping, matching notches, and easing around curves. The facing is then placed on top of collar, and sewn, sandwiching the collar between the facing and the garment. At this point, grading the seam allowances is critical to reduce bulk and allow the collar to lie flat. Starting with seam allowance layer that will lie closest to the outer fabric, slightly trim the seam allowance. With each layer of the seam allowance trim a bit deeper to form a stepped effect. Press the graded seam allowance away from the garment, and under stitch to the facing as far as you can along the seam. This will prevent the facing from rolling over and showing. Finally, on this garment there is top stitching along back of neck between the shoulders, which holds the back collar in place but is hidden under the collar.
Materials
• 4 yds Lightweight linen purchased about a year ago, 3.25 for garment.
• 2.0 Twin needle for pintucking
• Bernina Foot 46C – great for pintucking, and decorative stitches between the pintucks
• Size 16 wing needle – for hem stitches featuring tiny holes
• Isacord Polyester Embroidery Thread – close match to fabric
• OESD Aqua Mesh Plus – used to back the hem stitches
• Frixion Pens for Marking
• Five 5/8 inch self-covered buttons
• Lightweight Fusible Interfacing
Conclusion
I absolutely adore this blouse. Like the blouse, it makes me feel light, pretty, and feminine while wearing it. It is extremely comfortable. The key is to get the fit on the shoulders, neckline, arms, and bust perfect. This garment is versatile as it could be worn as is, or even used as a jacket for layering. The subtle bell-shaped sleeves, the curved hem lines, and the showpiece collar (made from a textile designed and created by myself) all come together to make it a truly unique garment.
Thanks again to Pattern Review, the judges, the mentors, the sponsors, and my fellow contestants who together make the sewing bee one of the highlights of my year.
I have been exploring new to me embellishment techniques recently. When this challenge was announced, I wondered how I could combine the “Knit Dress with a Twist” challenge with a new to me embellishment technique. I have several Alabama Chanin Design Studio books, which contain photos of amazing knit garments, embroidered, couched, and appliqued exquisitely. I decided to finally be brave and try some of these amazing hand sewing techniques. After a bit of practice and making a few samples, I was ready to start. I chose 5 Out of 4 Pattern’s Nancy Raglan Top, Tunic, and Dress pattern.
Materials
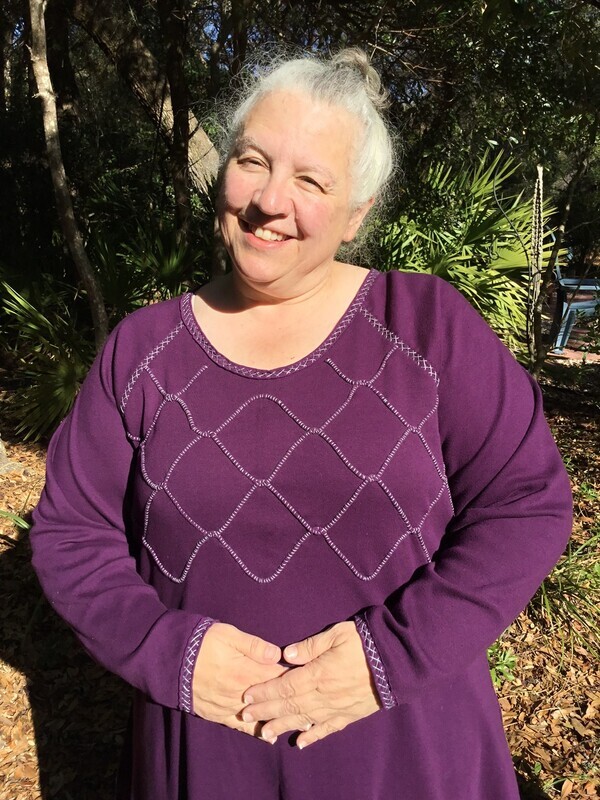
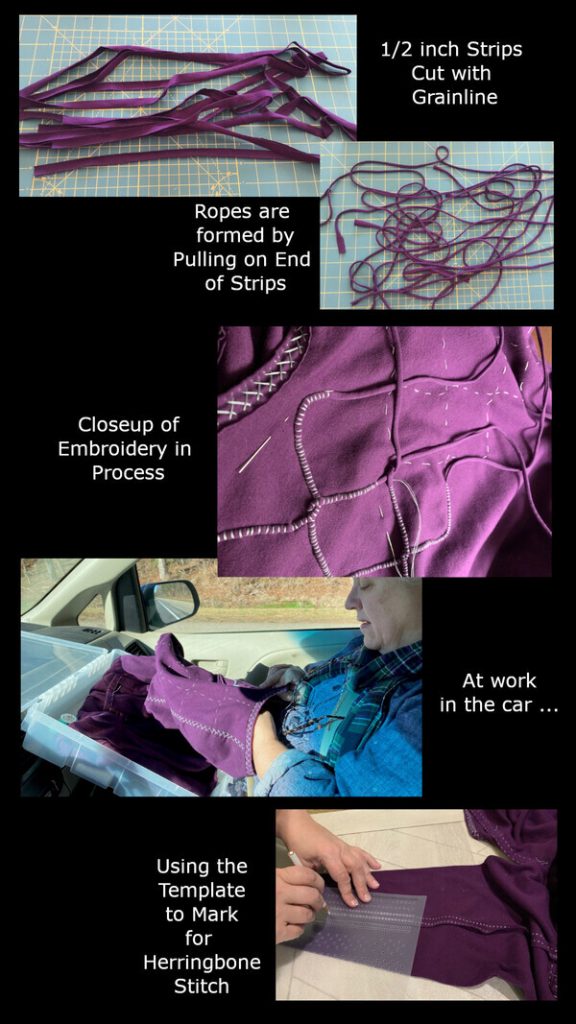
The Alabama Chanin methods are intended for organic cotton jersey. In my deep stash I found a medium weight double knit cotton jersey, in an eggplant purple color, which was more suitable as a the base fabric for the dress. I also found a much lighter weight cotton jersey in a very close match. The light weight cotton jersey would be perfect for creating the cotton jersey ropes, which I would twist around each other while couching them to the bodice of the dress, creating a striking design with textural interest. I used the recommended thread, which is a button and craft thread made up of a polyester core, wrapped in cotton. I only had a few colors available to me, so I chose a gray thread for most of the embroidery and couching. I also used navy thread when I wanted the stitching to be less visually striking along the side and under sleeve seams. I experimented with several needles before settling on Richard Hemming milliners size 7.
Design
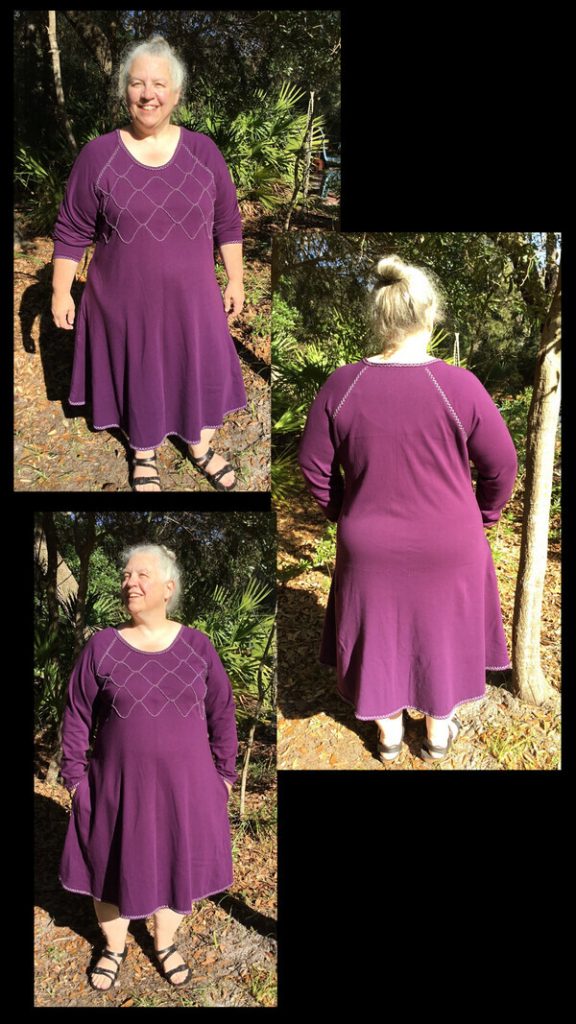
The design is a series of thin ropes twisting to form a chain link type of effect along the front bodice. The front contains 17 twists of ropes. Originally I was concerned that the bulk created by the twists would distort the drape of the garment, but after some experimentation I was happy with my results. The Alabama Chanin design method stresses using knit on knit. My design is such that the final garment retains almost all of the knit’s original characteristics of comfort and stretch. I covered all edges and seams with a herringbone stitch. I chose a round neck with full length sleeves. The combination of color choices and design created an almost renaissance fair feel about the garment.
Pattern
I choose 5 out of 4 Pattern’s Nancy Raglan Top, Tunic, and Dress pattern, because I love the close fit of the long sleeves, and the moderate A line flare of the dress. I modified the pattern grading from a 1X on top to a 3X at the waist, hips and sleeves. Since it is a raglan sleeve, the grading required using the 1X neckline and the width of the 1X bodice, while grading out to a 3X waist and hips. I used the 3X sleeves, but reduced the top width of sleeve to match top of the 1X sleeve width. After modifying, I measured and made sure seams lengths matched on front and back of the sleeves, and at the side seams. I was able to achieve a great fit with no darts or closures needed, thanks to it being made of stretchy knit and my lovely pear shaped figure. My muslin has become a favorite nightgown. This pattern is plus size inclusive and offers a lot of sleeve, neckline, and length options.
Construction
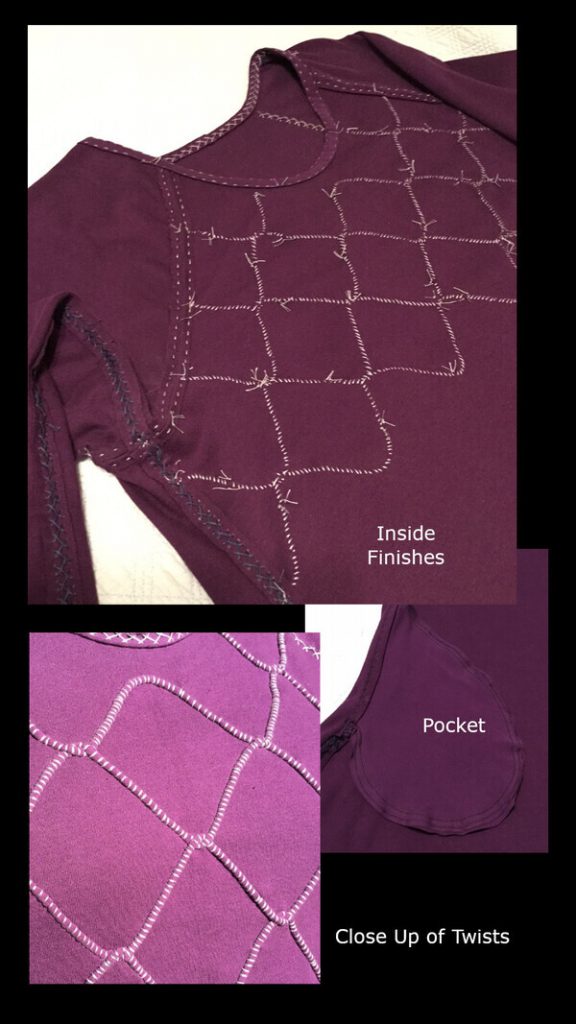
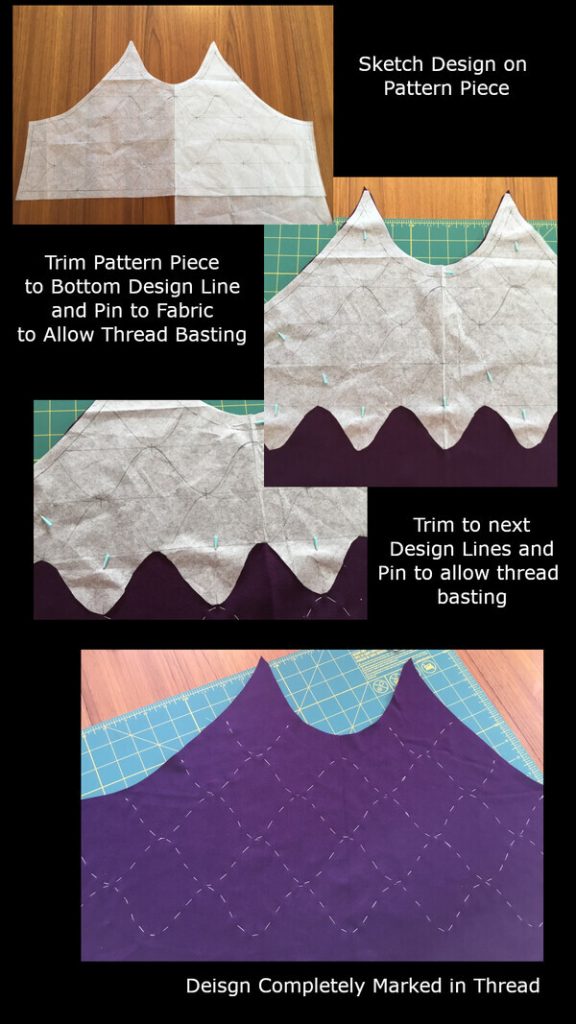
Following Alabama Chanin’s methods suggests making cotton jersey ropes from the light weight cotton jersey strips. I duplicated the front dress pattern piece, and sketched out my design. I then used the piece of pattern marked with the design piece to mark the design on to the actual front piece of the dress. Marking knits can be challenging but thread marking is my favorite method. I pin the pattern paper with the design marked on it to the front piece of the dress, and then hand baste along the bottom design line. I would then cut off the marked areas of pattern paper exposing the next design lines, and repeat until the design was completely marked with thread. I then started couching the ropes on to front piece of the dress. Ideally, I would have completed all of the couching prior to assembly, but our travel plans required a change of strategy. I was going to be in a car for 20 hours, which would allow me plenty of time for hand work. I also did not want to bring my sewing machine. I machine sewed the sleeves on, then the pockets, and finally the side seams with the under sleeve seams using a knit stretch stitch on my sewing machine. My goal was to hand finish all seams allowances, and hems in a way that the machine stitching would not be visible. In the end, the addition of pockets made me fall short, as there is some visible machine stitching around the pockets. Due to limited time, my inexperience with hand sewing construction seams, and the necessity of robust pocket construction I am happy with the compromise. The inside of the dress shows neat embroidery stitches with knotted tails, all cut off at a scant ½ inch as recommended by Alabama Chanin Studio. After laundering these will soften and fuzz up, but remain large enough so as to not pull through to the front.
Embellishment
The design is a series of 5 ropes, twisting across the front of the bodice, interrupted by the neckline. The ropes are created by cutting ½ strips along the grain line and pulling on the ends, which caused the fabric to tightly curl forming ropes. My ropes started out 40 inches long to avoid having to butt them end to end. There are a total of 17 twists across the front bodice. Although Alabama Chanin provided many photos and instructions for couching, I never observed the crossing of ropes, which made me a bit nervous. All the edges are finished with a 1.25 inch strip of lightweight cotton jersey cut across the grain line, folded in half, and then embroidered with gray herringbone stitch. The raglan sleeve seams are also covered with gray herringbone stitches, to frame the front bodice area. Since the pockets interrupt the side seams, I reversed the herringbone stitch, and used navy blue stitching to keep it from distracting from the other embroidery. The herringbone stitch reinforces while maintaining a stretch, and is a pretty way to finish the seam allowances throughout the dress. The real magic of Alabama Chanin’s is the templates provided which allows you to quickly and accurately mark your embroidery before stitching. The results are neat, uniform stitches, front and back! It makes even a beginner like me look proficient with just a little patience and practice. Also, I found the “love” the thread suggestion made a big difference.
Conclusion
In the end, I have a very comfortable and pretty knit dress. For my first attempt at these methods, I am extremely pleased. I am proud that I completed this challenge using only stash fabric and threads. At this point, I want to wash and wear the dress a few times to assess the robustness of my embroidery and couching stitches. If all goes well, I will be making a more involved design, perhaps combining the reverse applique with couching outlines as showcased by the Alabama Chanin Design Studio. Another idea is to use this technique to embellish using the ropes to write text. There are so many ideas running through my mind, and that is definitely the hallmark of a successful make. I definitely see some gorgeous organic cotton jersey in my future.
I highly recommend the Alabama Chanin Design Studio books and methods, especially for anyone interested in hand constructing and embellishing garments. Many thanks to Pattern Review and the Sewing Bee’s Mentors, Judges, and Sponsors.