So… I absolutely love the Great British Sewing Bee. I fantasize about being a participant, always cool and calm under pressure. Well, the closest I got so far, is my very first entry into PatternReview.com’s 2020 Sewing Bee. In the Great British Sewing Bee, contestants have hours to complete a project. In the Pattern Review Sewing Bee, I had a week, to complete a collarless knit tee shirt with some connection to childhood. Easy, right? Well, not so easy. Of course, I waited a couple of days to even begin. Then, I decided to make a dart-less tee shirt, embellished with embroidery. I wanted to use my own original embroidery designs. I already had a self drafted tunic pattern pattern with 3/4 length sleeves, which I had made several times in lighter weight knits. Some minor adjustments and I was golden. I also happened to have the perfect fabric: an almost full bolt of gray medium to heavy weight knit.

So… step one, coming up with a design concept. The contest was taking place during the coldest and snowiest part of the year for me. I found myself, grumbling about the snow plowing, the snow shoveling, the icy paths, and frigid walks with my dog. To me a tee shirt is light and cool, worn in the summer, or possibly buried under layers for added warmth in the winter. Not exactly an opportunity to showcase my talent. I was thinking of my childhood, and spotted the neighbors out with their little one, pulling her along in her sled, and it brought back a flood of childhood memories. I always loved winter, and snow. I loved skating, sledding, building snow forts, snowshoeing, and skiing. As a child, I loved that snowfall changed the landscape for me. Trees that were once too tall were now accessible, thanks to the new snow banks. Can you tell I was, well, still am a tom boy? I had my theme, snow.
Next, I decided to dust off my laptop and open up my design software and bang out a couple dozen snowflake designs. Easy, right? Well, not so easy. Of course, I installed my latest update, only to find that my laptop was not up to the task. Each step of the design took my poor old laptop forever. I spent a great deal of time watching the spinning ball, and wondering if I could muster enough patience to get through it. I managed to come up with 8 designs before I had reached the end of my patience. Excitedly, I grabbed my fabric, my tear away stabilizer, and powered up my new sewing machine. Yes, I had traded in my old sewing machine with embroidery capability, for a brand spanking new one. This would be my first time embroidering my new machine. Oh, and I had never embroidered on a knit fabric, only woven fabrics. So here are a few things I learned along the way. Remember to use ball point jersey needles on stretchy knits. Tear away is not appropriate for knit fabrics, use a cut away instead. And yes, cut away adds an extra time consuming step of having to trim away the excess while being careful not cut a hole in your beautifully embroidered fabric. When importing designs the stitch density must be considered and appropriate for your fabric and the stabilizer. Shrinking one of my original designs down too far, led to my first catastrophe, a knotted nest of thread under my stitch plate and a hole in my fabric. After clearing that mess, I started fresh, only to find my new machine throwing occasional top loops. Changing needles, re-threading, adjusting top tension did not improve things. I adjusted the bobbin tension on the bobbin case, but things went from bad to worse. It was the evening on a holiday weekend, and the embroidery was halted due to lack of dealer accessibility. When the dealer opened, I was there to pepper the staff with questions, and ended up purchasing a new bobbin case designed specifically for embroidery, and a multitude a stabilizers meant for use on knits. I cannot thank “little” Donna from Quilted Threads in Henniker, New Hampshire for all her help. Stop by this amazing shop if you are ever in the area, it is not to be missed. Equipped with proper materials, and some knowledge I forged on. Using my design software, I created a second set of my eight original designs only much smaller. This adjusted the stitch density accordingly and no more thread nests! It is recommended that a design be enlarged or reduced by no more than 20%. Also, my entire design was done in the same thread, so color changes were not necessary, but I did find it a good practice to occasionally re-thread the top thread anyway. Be sure to trim the starting tail, because if it is too long it will snag the design. I got through a perfect practice piece. I was ready to move on.
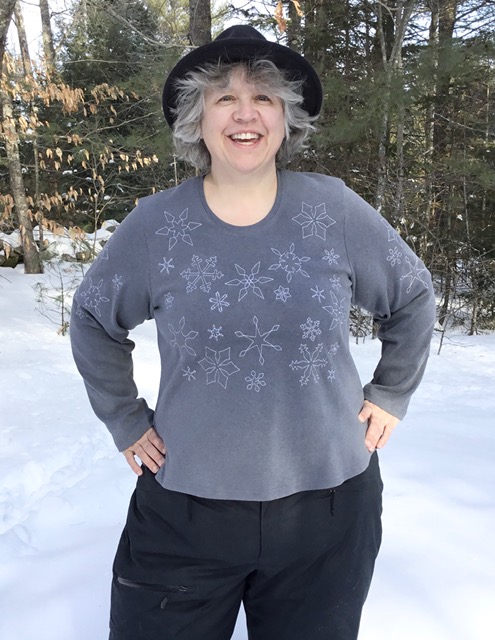
I washed and dried a 5 yard piece of a gorgeous gray medium to heavy weight knit, which I found on sale during a trip earlier this year to Fabric Mart, in Sinking Springs, Pennsylvania, another not to be missed spot . I am plus sized, but this knit was very wide, so I could make a long sleeve tee shirt with just 2 yards of it. It was a dream to mark, cut, embroider, and sew. Thank you sewing goddess for blessing me with this fabric, and a shout out to my husband who urged me to buy almost an entire bolt of it. I modified a pattern I had drafted for myself for a tunic with 3/4 length sleeves intended for lighter weight knit. I had made several of these successfully, resulting in a couple of my wardrobe favorites. I cut four rectangular over sized pieces each with the front, back and two sleeves marked on them. I hooped them up and embroidered the fabric, taking the placement into careful consideration. Being a pear shaped woman, I have learned that it is best to create interest that draws the eyes up to the face and chest area, and away from the waist and hips, so that resulted in the embroidery being only on the upper part of the garment. Maintain a good distance between edges in case adjustments are needed. I also used a tack for marking the bust apex, to avoid placing a snowflake on an apex, creating an unfortunate bulls eye effect. I then embroidered the four pieces. While one was being embroidered, I used the time to carefully trim away the excess. I highly recommend slowing down your machine during embroidering. It really improves the results and reduces drama. I did have a few false starts, but I stopped and picked out stitches and started again. The fabric recovered beautifully. Trimming the stabilizer took a long time, and was very stressful, but I managed to get through it.

I contemplated just cutting out my pieces and sewing them up, but my sewing sense was nagging me. So, I cut a second top out of the extra fabric. I threaded my serger and cover stitch machines with the proper color threads and did some test runs. I sewed up the stunt double with no problems at all. I slipped it on, only to find that the thicker knit, had changed the drape of the garment. My shoulder seam was almost a full inch too far back, and there was noticeable wrinkles near the under arm portion of the arm scye. Made adjustments to my pattern pieces by moving the shoulder seam, carving out a bit more of the arm scye, and deciding on the proper tee shirt and sleeve lengths. I retraced the new pattern pieces over the embroidered material. This is where leaving room near the seams is important so you have room to maneuver. I cut the four pieces out and was ready to sew.
Construction is straightforward. I serged the shoulder seams. I reinforce shoulder seams on tee shirts typically, but I could have skipped it with the thicker knit, I think. Next, I serged the sleeves on to each side. Some stretching was needed to make it align, but I find using little clips to place the seams, before moving to the serger, very helpful. The under arm and side seam were serged. I baste or thread tack the seam allowances into place before serging to insure proper placement during sewing, and avoid having pins anywhere near my serger blade. I also must stress the importance of pressing seams after each seam is sewn. It really does improve the overall look of the finished product. I flipped and ironed the bottom hem and cuffs, and then used my cover stitch machine to top stitch. Where seams meet, I cut a tiny bit into seam allowance by the fold, then flip seam allowances in opposite sides, this reduces the bulk. I use thread tacks to hold in place, and press it one more time. This preparation made the top stitching very smooth. My cover stitch machine comes with a clear curve foot, which is perfect for top stitching those tight curved areas. The final step was the neckband. I measured the neckline seam allowance, and reduced it by 20%. I cut a 1.5 inch bias binding strip from my knit, and sewed a mitered joint to give me the proper length band. The mitered join again reduces bulk. I pressed the neckband in half, with wrong sides together. I then used pins to mark four quarters of band starting with a pin near the join. I used 4 more pins to mark the four quarters of the garment neckline. This is done first by matching shoulder seams, then folding front and back, resulting in front and back centers on folds. Then match the front and back pins and find the two side centers, which do not necessarily fall on the shoulder seams. Making sure the join is in the back, I then matched up pins, and started clipping the stretched neck band to the garment, right sides together. I used my sewing machine set to knit stitch, and sewed the stretched neckband onto the garment with scant 1/4 inch seam. I pressed the neckband up. Pressing is important, once I was happy with the neckband, I used my cover stitch machine to top stitch. A clear foot, and going slowly, resulted in some fine looking top stitching around my neckband. One final press of the over all garment and I had a fine looking tee shirt.

I thought the hard part was over. But, then there was the photography. My incredibly understanding supportive husband snapped many photos, and listened patiently as I stressed over shadows and wrinkles. We had a good set of photos and called it a night. But the next morning we woke up to amazing sunshine, and we ended up taking another whole set photos during a morning walk with the dog, which was more fun and natural. The second set of photos were a huge improvement over the stiff posed shots taken the night before inside. Another lesson learned. Of course, that was not the final step. I had to create and publish a review of the project, and then officially enter it into the contest for judging. I will get the results in five days. Till then I will start cleaning the disaster area that was formerly my sewing room. I will also get reacquainted my husband and dog, my spin bike, and my kitchen. Because they were all ignored for the duration. My hat is off to anyone that participated on the Great British Sewing Bee. Perhaps it is a kindness that the challenges last only hours instead of days. I learned so much during this endeavor, and most of it had little to do with sewing.
Lessons learned:
- Make what you love. Make what will be worn. Do not compromise.
- Embroidery on knit, requires cut away stabilizer, jersey needles, practice, patience, and more practice and much more patience.
- Photography is a whole other art form.
- Writing a review is yet another whole other art form.
- A project will consume all the time available until the deadline.
My parting shot: I look pretty good even while I am wearing my puffy snow pants. Fingers crossed I make it to round two.

What a lot of work! I’m amazed that you were happily using a new machine for such a stressful challenge. I’ve been reminded of why it is that I am NOT a seamstress!
I made it to Round 2! WooHoo!